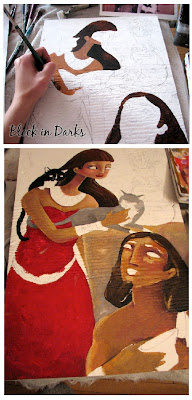
I developed the drawing, and went darker and darker with background.
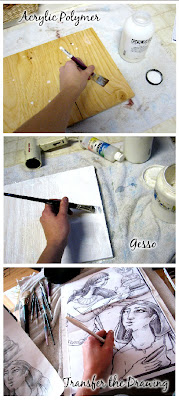
Here's another plywood painting that I completed and it's process (for greater detail click on each picture).
1• Create a confident drawing that will show you how to create your gradients and values (based on a greyscale drawing). Get it approved by your client. 
2•For a painting where the texture is important, choose your canvas wisley. I pulled about a round dozen sheets of pokey plywood off the hardware stores shelves before I found just the right "chunk" for this image. Tell the person who cuts out your block of plywood that it's for art and yes, you know canvases are cheap down at the local art store...!
3• Protect Your Painting before it's even started. Give it several good (thick) coatings of Multi Purpose Acylic Polymer so that weird chemicals don't leak into the painting over the years destroying the values you create. THEN! Protect your paint (it doesn't come cheap after all...) by Gessoing your surface. This will give your paint an extra "grip" or "mile" so that you don't have to layer it on really thick. I paint my gesso on in several layers in different directions so that the brush strokes aren't going to create a distracting pattern. Thing to Remember: Your brush strokes on every layer of every painting can help aid your composition! 
5• Block in Dark Colours. 
6• Think Details and Light. The concept is to have your darker colours in the "Valley" part of the plywood ridges and the light colours on the "peaks". This will really make the texture pop. For details do what you normally do, fill in the valleys and peaks with similar values. 
Wow Crystal! Great post. Just wondering, how do you transfer the drawing though? :) What do you use?
Happy Holidays!
I use a graphite transfer paper. These papers come in all sorts of colours: I just use a grey one. It works like carbon paper when you write a reciept out. :)
Hi Crystal,
Annette and I are so happy with this piece! You did a wonderful job and as nice as the photos are they just don't capture the vibrancy of the original. I look forward to seeing it each morning.
Cheers,
Nick
Hi Crystal...
this is a wonderful piece...nice colour and style...
Love the way you laid out all the work in progress...and the tecture of that wood is perfect for the painting...
I wish you and yours a most Magical Holiday Season and look forward to your work in 2008...
Cheers,
Diana