


 |
| Not-big-enough paper shoe - Needs more room for chocolate |
My tutorial for making paper shoes for St. Nicholas Day is probably my most popular post ever, which kind of cracks me up, since I hadn't imagined there would be much demand for such a goofy thing as a paper shoe. It's so popular that this cool online magazine, InCulture, asked me if they could reprint it this month as part of their holiday issue. You can find it here - and check out the rest of the magazine while you're at it. Lots of interesting articles on multicultural issues for kids and parents.
Anyway, I've recently learned there is an even greater need out there: a tutorial and template for a paper boot! Because boots are also traditional to put out for St. Nicholas Day and well-worn ones tend to smell even worse than used sneakers do, if that's possible. More importantly, a paper boot can hold WAY more chocolates and other goodies than a paper shoe can. That's a need I can appreciate.
I didn't really have any idea how to make a paper boot, though, so I turned to my smartest, most trusted friend: Ms. Google.
And she let me down. The only templates/examples I could find for paper boots were really lame. In particular, they failed on the most important characteristic of a paper boot: capacity. This is because they were basically boot-shaped envelopes.
I have limited footwear engineering skills. Really, that paper shoe pretty much exhausted them. Though I do have these really, really cool vintage-maybe-antique children's shoe "lasts." (See, I even know the technical lingo.) They're iron and really, really heavy.
 I bought them at an estate sale recently, even though I have no intention of becoming a shoemaker and don't have young children anymo
1 Comments on St. Nicholas Day Paper Boots: For When a Paper Shoe Simply Isn't Big Enough, last added: 12/3/2010
Display Comments
Add a Comment
 By: Carol Baicker-McKee,
on 12/22/2009
By: Carol Baicker-McKee,
on 12/22/2009
Blog: doodles and noodles (Login to Add to MyJacketFlap)
JacketFlap tags: children's book review, paper cut illustration, craft tutorial, holiday traditions, silhouettes, Add a tag

 I'm not sure why, but I always have urges to do cut paper crafts at Christmas (which is why the floors are always covered in tiny scraps at the holidays).
 The two paper cuts above were leftovers from a flurry I cut one year to decorate packages. They're basically just the snowflake idea. I precut thin paper (these were origami paper) into a circle, folded it in half (right sides together), in half again, and then into thirds and then cut patterns out freehand. There are a few simple tips that may help you make especially intricate ones: first, do the folding carefully and press the creases well (you can even iron them). Second, have a mixture of large cut away areas and others that are narrow and repeating. Be sure to use very sharp scissors; I use embroidery scissors. (Though check out these amazing Polish paper cuts that were traditionally made with sheep shears!) Finally, take care not to tear delicate areas when you unfold them. (Small tears can be repaired by gluing narrow support pieces to the back of the paper cut.) I always iron my finished piece flat.
 The paper cut above was done by my oldest son when he was almost 10, and the similar one below was cut when he was not quite 5. You can see he gained a lot of skill in the years between. In both cases, I folded a piece of paper for him (right sides together) and drew one image onto the wrong side, making sure I had an area of join along the fold. By 10 he was able to cut the design out pretty accurately by himself. I showed him how to trim the excess paper close to the drawn lines and then to cut into tight areas, removing sections at a time, rather than trying to cut along the whole perimeter. When he was younger, I held
 The paper cut above was done by my oldest son when he was almost 10, and the similar one below was cut when he was not quite 5. You can see he gained a lot of skill in the years between. In both cases, I folded a piece of paper for him (right sides together) and drew one image onto the wrong side, making sure I had an area of join along the fold. By 10 he was able to cut the design out pretty accurately by himself. I showed him how to trim the excess paper close to the drawn lines and then to cut into tight areas, removing sections at a time, rather than trying to cut along the whole perimeter. When he was younger, I held
1 Comments on Cut Paper Christmas, last added: 12/22/2009
Display Comments
Add a Comment
By: Carol Baicker-McKee,
on 12/2/2009
Blog: doodles and noodles (Login to Add to MyJacketFlap)
JacketFlap tags: hot + not, children's book review, recipe, craft tutorial, holiday traditions, Add a tag
 I'm joining in again with what's hot and what ain't at Loobylu (and you should definitely head over there to wish her a happy 10th blogging birthday at a minimum), but I'm starting to squeak in just under the deadline every week - but it's one of the "nots" fault. At least it's not yet midnight on Wednesday (here in Pittsburgh anyway), so here's my list:
HOT
A Template for the Scandinavian Heart Tutorial Which I posted, um, last December here. Well, now that I've remembered again how to turn jpegs into pdf files and post them so you can actually get them (I think Blogger still doesn't allow them - somebody please correct me if I'm wrong), I decided to make a new printable (can't find the old one anymore) and quick get it up. You can get it here. It's not exactly pro-quality or anything, but it does get the job done - as shown in the examples above.
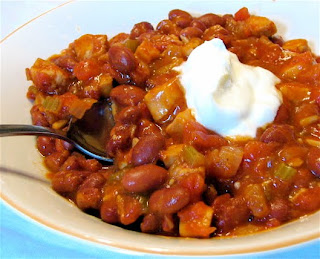
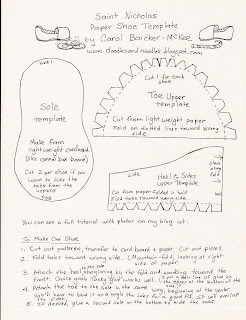
 This (above, not the chili below) is what the finished templates should look like when you make them out of your cereal box.
 Turkey Chili - and Using Up the Last of the Thanksgiving Turkey
By: Carol Baicker-McKee,
on 12/1/2009
Turkey Chili - and Using Up the Last of the Thanksgiving Turkey
By: Carol Baicker-McKee,
on 12/1/2009
Blog: doodles and noodles (Login to Add to MyJacketFlap)
JacketFlap tags: craft tutorial, holiday traditions, St. Nicholas, Add a tag
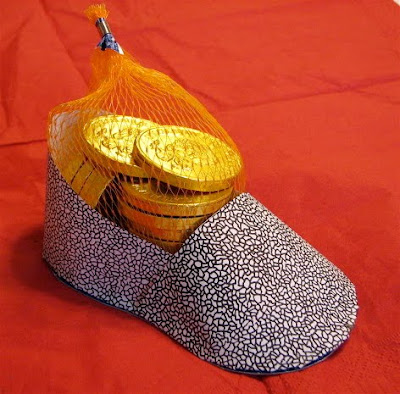 How goofy are paper shoes? But when I checked the stat thing for my blog the other day, I noticed that lots of people have been coming here looking for directions and a template for making them for St. Nicholas Day, which is coming up fast on December 6th. I felt kind of bad because I don't have anything like that on here. And then, probably because I've been busy making little bunny slippers for my Mimi doll, I realized I could figure out how to make some, so I did. These ones are just the right size to hold the bag of chocolate coins St. Nick is likely bringing my kids in a few days. (You can buy the same ones at Aldi's. Yum.) These paper shoes turn out to be very easy to make, and practically free (except for a small quantity of glue) because I used all materials from the recycling bin.

 Add a Comment
By: Carol Baicker-McKee,
on 11/23/2009
Add a Comment
By: Carol Baicker-McKee,
on 11/23/2009
Blog: doodles and noodles (Login to Add to MyJacketFlap)
JacketFlap tags: miniatures, craft tutorial, an apple pie for dinner, Add a tag
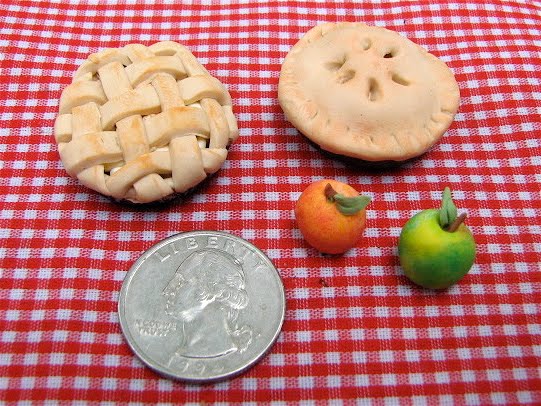
 Well, I still haven't managed to resurrect my old hard drive. But I've decide to celebrate having a new computer up and running by recreating the mini apple pie tutorial I mentioned in an earlier post here. This tutorial is more or less the process I used to make the apple pies in my newest picture book An Apple Pie for Dinner (by Susan VanHecke, Marshall Cavendish, 2009). I learned the basic strategy for making the pies, the apples, and many of the other clay miniatures for the book from Sue Heaser's outstanding book Making Doll's House Miniatures with Polymer Clay.
  You can read about Sue at her website here and also find ordering information for the book - which I really cannot recommend highly enough if you're into making polymer clay tiny things.
 STEP 1: Gather your materials (most of which are shown above)
By: Carol Baicker-McKee,
on 12/2/2008
STEP 1: Gather your materials (most of which are shown above)
By: Carol Baicker-McKee,
on 12/2/2008
Blog: doodles and noodles (Login to Add to MyJacketFlap)
JacketFlap tags: recipe, craft tutorial, Christmas traditions, Add a tag

Two projects today - both tasty, and both for making those red mushrooms seen so often at Christmas. The how-to for both in a second, but first a few words about why mushrooms at Christmas?
I love these mushrooms, don't get me wrong. I have a number of mushroom ornaments for our Christmas tree as well as other cute little mushroom decorations, some of which I leave out year round. But I've always been curious about their relationship to the holiday (just not curious enough to research it until today).
And it turns out, no one really knows for sure. But Sheila Brown in this interesting article on the Christmas mushroom details some of the theories. First, the amanita Muscaria or "fly agaric" mushroom (aren't those both unappealing names? especially the common one?) is considered a sign of luck, which is why it's often included on Christmas cards. Second, it's associated with the evergreens used to decorate at Christmas. Basically, the fungi grow around evergreens and have an interdependent relationship with them, so they've become associated with each other. Some people think, probably wrongly, that Santa dresses in red and white because of these guys. Oh, and one more interesting bit of trivia: this type of mushroom is called the "fly" agaric because flies are attracted to it. (Not sure what the agaric part means except maybe it's the gagging sound people make because of all those gross flies.) Folks used to put bits of the mushrooms in bowls of milk; the flies would drink the milk and mushroom mixture, get drunk, and fly into things and die. Doesn't that sound nice and Christmas-y?
One last crucial piece of information. Mushrooms in the amanita family are poisonous - ranging from moderately bad news like these ones to extremely/fatally toxic - so better to avoid nibbling on them, especially because they all look pretty much alike. Unless they're these sugary amanitas that I'll tell you how to make.
First, because they're so simple, the gumdrop ones. Basically all you need is a red gumdrop, a white gumdrop, a knife, and a high tolerance for sticky fingers. First, carve a stem shape out of the white gumdrop, making sure to cut the sugary part off the bottom (so the mushroom will stick to whatever surface you put it on and remain more or less upright) and the top (so the red part will stick to it). Save the extra white parts because you need them to make the little white dots. Next, cut the bottom off the red gumdrop. Then chop and mush little bits of the leftover white gumdrop to make tiny dots. Carefully peel the dots off your fingers (easier said than done) and stick them to the red gumdrop in a pleasing, mushroom-y pattern. (On real mushrooms, those white dots are little bits of the stem still sticking to the cap from before the cap emerged.)
Then stick the red top on the white bottom, squish it around a bit until it sits nicely, and you're done. You can eat it right away, but if you let it sit out in the air for a few days, it gets hard and looks pleasantly translucent and decorative sitting on a shelf or hanging from the Christmas tree (just be sure to stick the hook in before it gets totally hard if you're going to hang it).
Next up: the no-bake mint mushrooms. I found this recipe, which my daughter and I used many years ago to make little snowmen, on a scrap of paper tucked in a cookbook. I think but was unable to confirm, that we originally got it from American Girl magazine. At any rate, it works equally well for snowmen or mushrooms, as you please.
You need:
Directions: In a small bowl, combine the butter, corn syrup, extract and salt. Gradually stir in confectioners' sugar. Knead by hand for 1-2 minutes or until mixture becomes pliable. Depending on the weather conditions, you may need to add more confectioner's sugar. The dough should be pretty stiff (or the mushrooms will tend to "melt" and collapse in a most disturbing way) - but you don't want it to get crumbly.
Divide the dough in half and place in separate bowls. Leave one half white, and add a few generous glops of the red food coloring to the other, stirring and kneading to combine well. You may need to add a little extra sugar at this point to keep it firm enough.
After accidentally smushing a few of my early attempts, I hit on this method for forming the mushrooms. (I made teeny tiny ones, which appeal to my love of all things miniature, as well as to my limited tolerance for candy that doesn't involve chocolate - why waste the calories? - but you could always make bigger ones; the process would be the same.) Tear off a piece of waxed paper for a work surface. Pinch off some white dough and roll a log to whatever width you desire. Cut off the length you want. Shape the stem some more, so that it's wide at the base and tapers toward the top. Tap both ends against the waxed paper to flatten and leave to air dry a bit. Make a whole bunch more stems. (You may want to cover the bowls of dough with a damp paper towel while you're working so the dough doesn't dry out too much.)
Next, form the caps by roll a small ball and flattening a bit. Experiment with different shapes. (I like variety in my mushrooms, but you could always strive for uniformity if you prefer). Pour a small quantity of nonpareils in a shallow bowl. Then press your fingertip against a damp paper towel and use it to chase around and pick up individual white nonpareils. It's a bit painstaking at first, but you'll get better. Gently press them over the cap. After you've made a bunch of caps like this, dampen the top of the stem with a wet fingertip, and carefully pick the caps up and place them on the stems, pushing them down slightly so they'll adhere well. Allow to air dry for a few hours, and then they're good to eat!
These make a very pretty gift in a small tin - just make sure the get-ee realizes they're food. We had someone preserve her little snowmen for several years thinking they were decorations (and wondering why they had that odd minty freshness).

 This (above, not the chili below) is what the finished templates should look like when you make them out of your cereal box.
 Turkey Chili - and Using Up the Last of the Thanksgiving Turkey
This is such an easy meal and satisfying on a cold night (and again for lunch the next day) and it makes a nice change from yet another turkey sandwich. I make my chili dinners a little differently each time (my usu
3 Comments on Hot+Not: Hearts and Chili and More, last added: 12/6/2009
Display Comments
Add a Comment
By: Carol Baicker-McKee,
on 12/1/2009
Blog: doodles and noodles (Login to Add to MyJacketFlap)
JacketFlap tags: craft tutorial, holiday traditions, St. Nicholas, Add a tag
 How goofy are paper shoes? But when I checked the stat thing for my blog the other day, I noticed that lots of people have been coming here looking for directions and a template for making them for St. Nicholas Day, which is coming up fast on December 6th. I felt kind of bad because I don't have anything like that on here. And then, probably because I've been busy making little bunny slippers for my Mimi doll, I realized I could figure out how to make some, so I did. These ones are just the right size to hold the bag of chocolate coins St. Nick is likely bringing my kids in a few days. (You can buy the same ones at Aldi's. Yum.) These paper shoes turn out to be very easy to make, and practically free (except for a small quantity of glue) because I used all materials from the recycling bin.
My husband says blogging is making me completely lose my marbles. He may be right. Only now am I wondering why people would want to make paper shoes for St. Nick Day - for party favors? For a class project? Because they're not sufficiently addicted to chocolate to overlook the fact that their bag of chocolate coins smells a bit like old sneaker if they put out their regular shoes to receive treats, like we do?
Whyever. Here's the tutorial:


STEP ONE: Gather your materials You'll need:
- a printed copy of the template, which is available as a pdf here,
- some lightweight cardboard (I used some from an empty cereal box),
- some scrap paper (I used the insides of security envelopes, which I am absolutely addicted to these days - I have fits if anyone rips the envelopes when opening bills),
- some kind of a quick grabbing glue, like Alene's Fast Grab Tacky Glue, pictured above (and no, Aleene's does not give me any kind of a kickback for how frequently I mention their glues, but I wouldn't say no if they offered one...),
- a pair of scissors, and
- a pencil for tracing the patterns
 0 Comments on Get Ready for St. Nicholas Day - by Making Paper Shoes with My Handy-Dandy Tutorial! as of 1/1/1900
 By: Carol Baicker-McKee,
on 11/23/2009
By: Carol Baicker-McKee,
on 11/23/2009
Blog: doodles and noodles (Login to Add to MyJacketFlap)
JacketFlap tags: miniatures, craft tutorial, an apple pie for dinner, Add a tag
 Well, I still haven't managed to resurrect my old hard drive. But I've decide to celebrate having a new computer up and running by recreating the mini apple pie tutorial I mentioned in an earlier post here. This tutorial is more or less the process I used to make the apple pies in my newest picture book An Apple Pie for Dinner (by Susan VanHecke, Marshall Cavendish, 2009). I learned the basic strategy for making the pies, the apples, and many of the other clay miniatures for the book from Sue Heaser's outstanding book Making Doll's House Miniatures with Polymer Clay.
  You can read about Sue at her website here and also find ordering information for the book - which I really cannot recommend highly enough if you're into making polymer clay tiny things.
Anyway, here's the tut (I'll do the apples, and maybe some pumpkins or something too, tomorrow. I hope.):
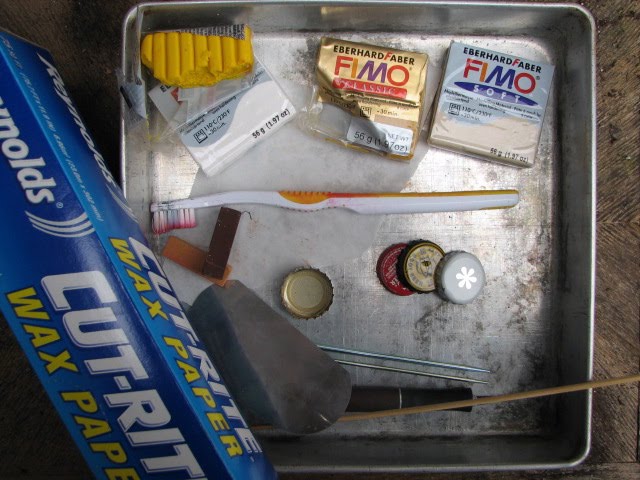 STEP 1: Gather your materials (most of which are shown above)
- Clay I used Fimo "sandstone" for the crust and a mix of yellow and white for the apples (but you could certainly cheat on them since they barely show). Any brand of polymer clay will work. If you're making this with a very young child, you might want to consider using a more kid-friendly modeling material like Crayola's Model Magic, plasticine, or even play dough. For that matter, you could use snippets of real dough and apple bits (though I'd recommend either not eating the finished product or removing the plastic liner from the bottle cap first).
- Bottle Cap This will be the pie pan. You can buy unused ones at craft stores or some kitchen/beer-making supply places and they're really ideal since they flare out a little more. But I just used one from a bottle of root beer, and it was fine. If you're making this with a young child, consider using some larger "pan" like a bigger metal lid or dessert patty pan - this scale is challenging for little fingers.
- Soft Pastels OR Ground Cinnamon You'll use these to "brown" your pie to a lovely golden color. You also need a tool to scrape some of the pastel dust off and a paint brush to spread the coloring, whichever you u
0 Comments on Miniature Apple Pie Tutorial as of 1/1/1900Add a Comment
By: Carol Baicker-McKee,
on 12/2/2008
Blog: doodles and noodles (Login to Add to MyJacketFlap)
JacketFlap tags: recipe, craft tutorial, Christmas traditions, Add a tag


Two projects today - both tasty, and both for making those red mushrooms seen so often at Christmas. The how-to for both in a second, but first a few words about why mushrooms at Christmas?
I love these mushrooms, don't get me wrong. I have a number of mushroom ornaments for our Christmas tree as well as other cute little mushroom decorations, some of which I leave out year round. But I've always been curious about their relationship to the holiday (just not curious enough to research it until today).
And it turns out, no one really knows for sure. But Sheila Brown in this interesting article on the Christmas mushroom details some of the theories. First, the amanita Muscaria or "fly agaric" mushroom (aren't those both unappealing names? especially the common one?) is considered a sign of luck, which is why it's often included on Christmas cards. Second, it's associated with the evergreens used to decorate at Christmas. Basically, the fungi grow around evergreens and have an interdependent relationship with them, so they've become associated with each other. Some people think, probably wrongly, that Santa dresses in red and white because of these guys. Oh, and one more interesting bit of trivia: this type of mushroom is called the "fly" agaric because flies are attracted to it. (Not sure what the agaric part means except maybe it's the gagging sound people make because of all those gross flies.) Folks used to put bits of the mushrooms in bowls of milk; the flies would drink the milk and mushroom mixture, get drunk, and fly into things and die. Doesn't that sound nice and Christmas-y?
One last crucial piece of information. Mushrooms in the amanita family are poisonous - ranging from moderately bad news like these ones to extremely/fatally toxic - so better to avoid nibbling on them, especially because they all look pretty much alike. Unless they're these sugary amanitas that I'll tell you how to make.
First, because they're so simple, the gumdrop ones. Basically all you need is a red gumdrop, a white gumdrop, a knife, and a high tolerance for sticky fingers. First, carve a stem shape out of the white gumdrop, making sure to cut the sugary part off the bottom (so the mushroom will stick to whatever surface you put it on and remain more or less upright) and the top (so the red part will stick to it). Save the extra white parts because you need them to make the little white dots. Next, cut the bottom off the red gumdrop. Then chop and mush little bits of the leftover white gumdrop to make tiny dots. Carefully peel the dots off your fingers (easier said than done) and stick them to the red gumdrop in a pleasing, mushroom-y pattern. (On real mushrooms, those white dots are little bits of the stem still sticking to the cap from before the cap emerged.)
Then stick the red top on the white bottom, squish it around a bit until it sits nicely, and you're done. You can eat it right away, but if you let it sit out in the air for a few days, it gets hard and looks pleasantly translucent and decorative sitting on a shelf or hanging from the Christmas tree (just be sure to stick the hook in before it gets totally hard if you're going to hang it).
Next up: the no-bake mint mushrooms. I found this recipe, which my daughter and I used many years ago to make little snowmen, on a scrap of paper tucked in a cookbook. I think but was unable to confirm, that we originally got it from American Girl magazine. At any rate, it works equally well for snowmen or mushrooms, as you please.
You need:
1 tablespoon butter, softened
1 tablespoon light corn syrup
1/2 teaspoon mint extract
1/8 teaspoon salt1 cup confectioner's sugar
A few drops red food coloring
White nonpareil candies (if you can find a jar of just the white ones you're lucky. Otherwise you'll have to pick the white ones out of the mix of a zillion colors. Or you could go buy a box of the tasty Sno-Cap candies, brush the white balls off into a bowl and eat the chocolate so it doesn't go to waste.)
Directions: In a small bowl, combine the butter, corn syrup, extract and salt. Gradually stir in confectioners' sugar. Knead by hand for 1-2 minutes or until mixture becomes pliable. Depending on the weather conditions, you may need to add more confectioner's sugar. The dough should be pretty stiff (or the mushrooms will tend to "melt" and collapse in a most disturbing way) - but you don't want it to get crumbly.
Divide the dough in half and place in separate bowls. Leave one half white, and add a few generous glops of the red food coloring to the other, stirring and kneading to combine well. You may need to add a little extra sugar at this point to keep it firm enough.
After accidentally smushing a few of my early attempts, I hit on this method for forming the mushrooms. (I made teeny tiny ones, which appeal to my love of all things miniature, as well as to my limited tolerance for candy that doesn't involve chocolate - why waste the calories? - but you could always make bigger ones; the process would be the same.) Tear off a piece of waxed paper for a work surface. Pinch off some white dough and roll a log to whatever width you desire. Cut off the length you want. Shape the stem some more, so that it's wide at the base and tapers toward the top. Tap both ends against the waxed paper to flatten and leave to air dry a bit. Make a whole bunch more stems. (You may want to cover the bowls of dough with a damp paper towel while you're working so the dough doesn't dry out too much.)
Next, form the caps by roll a small ball and flattening a bit. Experiment with different shapes. (I like variety in my mushrooms, but you could always strive for uniformity if you prefer). Pour a small quantity of nonpareils in a shallow bowl. Then press your fingertip against a damp paper towel and use it to chase around and pick up individual white nonpareils. It's a bit painstaking at first, but you'll get better. Gently press them over the cap. After you've made a bunch of caps like this, dampen the top of the stem with a wet fingertip, and carefully pick the caps up and place them on the stems, pushing them down slightly so they'll adhere well. Allow to air dry for a few hours, and then they're good to eat!
These make a very pretty gift in a small tin - just make sure the get-ee realizes they're food. We had someone preserve her little snowmen for several years thinking they were decorations (and wondering why they had that odd minty freshness).
0 Comments on Mint and Gumdrop Mushrooms as of 1/1/1900
Add a Comment
Love this!
St Nick
www.StNicksday.com