 The locks all combed and ready to spin, just as soft as they look in the photo. A winter nest anyone?
As promised, here's a post about how I'm preparing the fleece I bought at the Royal Winter Fair. This is the fleece as it arrived home in a big shopping bag:
 I even got to keep the 1st place ribbon this fleece won!
Fleece from: Ann Moffat in Schomberg
I've done a lot of reading lately on how to do this. I've ordered lots and lots of library books on the topic and read them pretty much cover to cover.
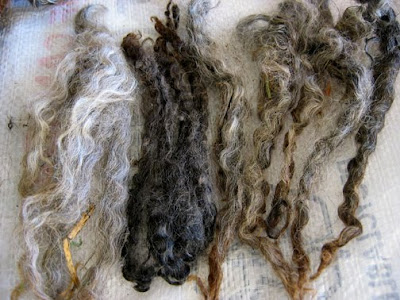 The locks in this fleece range in colour from pale silvery grey to very dark brown/black (pictured in the 2nd lock photo)
Once the locks are washed they needed to be picked apart before putting them on a drum carder. Then the drum carder combs the fleece into a batt which can be divided into roving so that it's ready to spin. You can also use drum carders to blend a variety of fleeces together. I'd like to try one sometime, but for now they're out of the budget at hundreds of dollars. In the future I may rent one.
Another way is to buy two hand carders (or mini-carders) and comb a small amount of locks at a time. Then you can roll up the fleece vertically into rolags for woolen spinning (lofty and fuzzy) or roll it up horizontally to make roving for worsted spinning (smoother, with aligned fibres). You can also use special sharp combs to comb out long locks.
The last way, which is the least expensive, is to just use a flick brush to comb out each lock. A dog brush works just as well, and that's what I have. As usual I'm trying to do things the simplest way I can without too many fancy tools, so that's one of the reasons I chose a fleece with well-defined locks so I could prepare it this way.
 The locks vary in length, I've started working on the long (medium gray) ones
After flicking, I place the locks in a basket always aligned the same way
 This morning I did a little Kool-Aid dyeing with some white roving I had in my stash. I've been seeing fat braids of yummy hand painted roving online but I'm feeling poor so I decided I should try it myself. We'll see how it goes...
I've noticed that roving with mixed colours can look garish, but once spun up and plied it changes how the colours work together. I've been seeing stunning examples on Flickr which have really inspired me.
While looking up info on spinning I found some tips on dyeing roving. I was reminded about how easy it is to do dyeing with Kool-Aid which allows you to use your regular dishes. I even had some Kool-Aid left over from dyeing yarn a long time ago so I didn't even have to go to a bunch of grocery stores trying to find a range of flavours.
Steps:
1. Add warm water and 1/2 cup of vinegar to a microwaveable dish. I used a ceramic dish. Place your roving lined up in rows to soak. You can push the roving down into the water but throughout the process handle it gently so that it doesn't felt - no twisting/wringing etc. And no moving the wool from hot to cold which shocks the fibres and can lead to felting.
*Don't use a rectangular dish that won't fit into your microwave because you will be sorry when you have to try to move a soppy mess of Kool-Aid soaked roving into another smaller dish and you will be very frustrated and feel stupid. Ask me how I know.
 I mixed a variety of flavours: orange, strawberry, lemon-lime and raspberry with red and blue food colouring
2. While the roving is soaking you can organize your colours. I opened the packets of Kool-Aid into glasses of water and stirred them. You can use some paper towel as a palette to dab with each colour so that you can see it clear
ly. Mixing can give you colours like brown and olive green, if you prefer bright colours don't mix! Of course you can add extra water to dilute a colour and make it lighter.
3. After soaking the roving for 10 minutes I applied the Kool-Aid. Pour or spoon the Kool-Aid onto the wool wherever you'd like the colour to go. You can use a spoon to gently pat and spread the colour around. Remember it will blend a bit more by itself.
4. When you're happy with how the roving looks carefully place the dish in the microwave. The water should just barely cover the yarn.
5. Microwave for 5 minutes and take out your dish using oven mitts. Tilt the dish a tiny bit so that you can see the water. If it's clear then the wool has absorbed the dye.
 This is the only picture I took of roving in the dish, this one was a bit of a mistake, I meant the colours to be more distinct. I'll wait and see how it looks spun up & plied
6. Let the dish of roving sit and cool down. Once it's cool you can rinse the roving and pat with a towel before hanging to dry. Remember not to twist or wring the yarn.
Next post you can see how mine turned out!


 The locks all combed and ready to spin, just as soft as they look in the photo. A winter nest anyone?
 I even got to keep the 1st place ribbon this fleece won!
 The locks in this fleece range in colour from pale silvery grey to very dark brown/black (pictured in the 2nd lock photo)
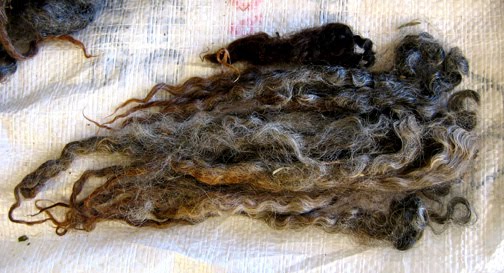 The locks vary in length, I've started working on the long (medium gray) ones


Hi there,
A friend in Guelph passed your blog address to me and now I think you may be the lovely person I met at the Royal. I bought a white fleece and you took a far too small handful home with you. Could this be you?
Molly
Yes that's me! It was really nice to meet you, I was sorry I didn't think to ask your name.
Claire