new posts in all blogs
Viewing: Blog Posts Tagged with: quilt, Most Recent at Top [Help]
Results 1 - 23 of 23
How to use this Page
You are viewing the most recent posts tagged with the words: quilt in the JacketFlap blog reader. What is a tag? Think of a tag as a keyword or category label. Tags can both help you find posts on JacketFlap.com as well as provide an easy way for you to "remember" and classify posts for later recall. Try adding a tag yourself by clicking "Add a tag" below a post's header. Scroll down through the list of Recent Posts in the left column and click on a post title that sounds interesting. You can view all posts from a specific blog by clicking the Blog name in the right column, or you can click a 'More Posts from this Blog' link in any individual post.
 |
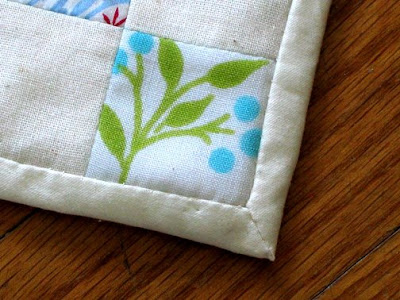
| Elephant Day 2015 Illustration |
I love drawing elephants! At one point, I had way too many elephants in my portfolio, but recently I realized that there are none now. I'll have to remedy that situation.
I've been able to fit some fun creative playtime into my week. I made a small collage painting (you can view the video
here). I doodled in my sketchbook. Something I don't usually do, but I was inspired by the
Sketchbook Explorations class by Lisa Congdon on Creativebug.
Here's a little snippet from a work in progress I finished up this week.
 |
| Snippet from a work in progress |
With the help of my mom, husband, and son, I finally got this quilt basted. Now I'm waiting on the elves to come and quilt it for me. The fabric is by
BariJ.
I hope you've had a creative week also!

I actually have three patchwork projects going now. Yes, three. Yes, I have a problem.
Hopefully more about the others soon. But this one started in the most irresistible way. I was making a bed cover for my daughter (10) when my son (7) declared he wanted a quilt, too. I told him he could look at some of my quilting books for inspiration, and he sat down and thumbed through them. He liked the Gee’s Bend book the best (is this kid good at getting brownie points or what? Gee’s Bend is my inspiration for all things quilty). Then he set about arranging my scraps into patterns.
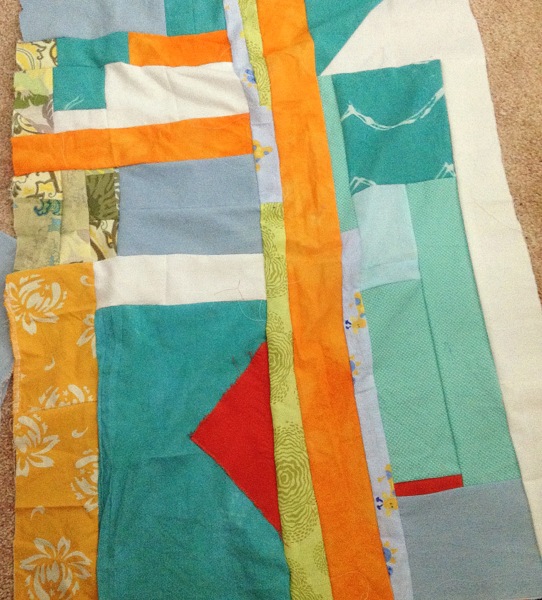
It’s been so fun to see what he comes up with. He’s very particular. Also fun to see what surprises come together as the patchwork grows. The way the deep orange pops, the way the blues and greens begin to blend together, the way the prints dance and change character according to their placement and size.

All of these fabrics have a story. They’re bits from friends and family or pieces of other projects, some reeeeeally old.

He seems to want it to be a lap quilt. For more of my patchwork projects, click here.
Finished Call the Midwife (the book). It was very good. I especially love the stories about the nuns. Fascinating people.


Happy New Year! Did you survive the holidays? Ours started out low key and then sped up after Christmas with the Colorado wedding of a dear friend, a couple of days of skiing, and 3 stitches in my lower lip after a minor fall.
Don’t worry, I’m fine! Luckily, nothing was broken, so I could go right back to skiing. Actually I can only find 2 stitches now. They are not the dissolvable kind, so I don’t know if I misplaced a stitch or if I just miscounted. Hmmm…
I’m finding, unexpectedly, that I kind of love January. Not for the weather. Who could love January weather, even in the South? But I love getting back into the routine and not having a bajillion outside actitivities to distract and exhaust me. And the days are getting just a tiny bit longer. So I’m told.
Currently I’m back to work on my nonfiction book for elementary-aged students. I’d taken several weeks away from it while focusing on my novel, and the break has really helped clarify things. It still needs a lot of work, but I’m excited to see how far it’s come since my initial brainstorm. I’ve been getting some feedback on both projects from writer friends, which is so invigorating!
The above picture is a sneak peek of a quilt I’m working on. It finally seems to be coming together, though it’s looking like spaghetti to me right now. For more sewing and quilting projects, click here.
What about you? What’s inspiring you this month? Reading anything fantastic? Stay warm, folks!


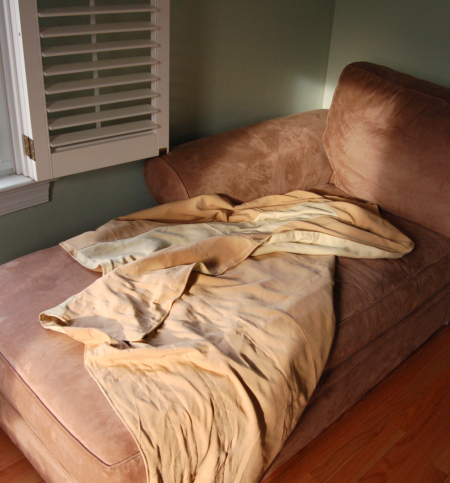
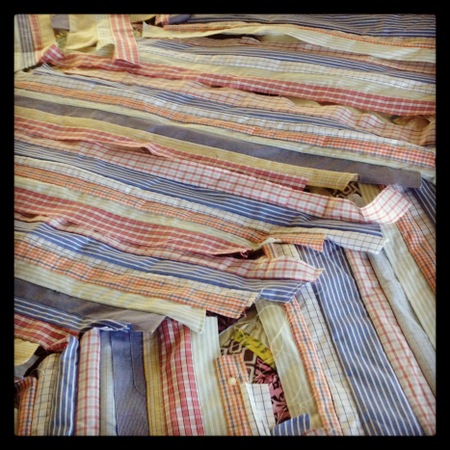
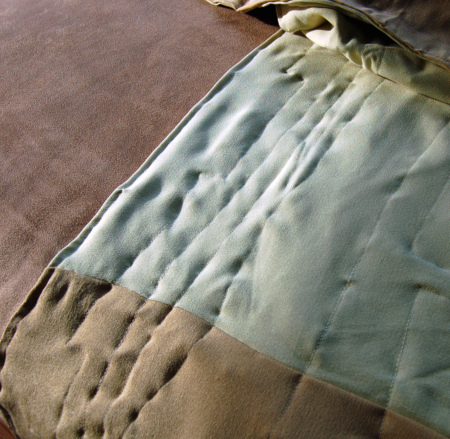
I got a bunch of lovely silk remnants (crepe?) from a friend who was leaving Hannover some time ago. I’d never sewn with silk before, but it only took me two years to work up my nerve to actually run it through the sewing machine.
I thought and thought about the best thing to make with it. The remnants are lovely but a little pale for my coloring. I over-dyed some of it, which I’ve been working into a dress. I was planning to use all of it for clothes, but the camel and pale green then turned out to be just right for a throw for our “book nook.”
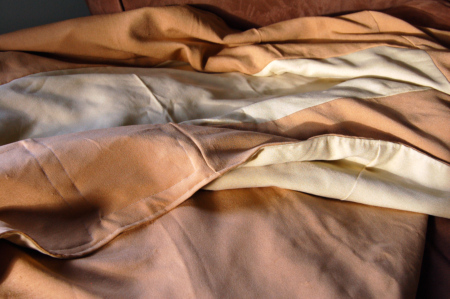
Ever since reading Handmade Home, I’ve been wanting all sorts of handmade throws to snuggle up with. And natural fibers! But of course natural fibers for a large project get pretty expensive.
But with gifted silk remnants, the decadence could be mine, all mine! And really, was imperfect silk sewing really better than letting all that lovely silk just sit in storage?
My original plan was to quilt the throw. The assembly part went pretty well, not as tricky as I’d feared. I used part of an old sheet for the middle layer. But machine-quilting silk was another story. I liked making crazy lines with the machine, but the silk got all slippy and puckery, but not in a fun way. So I just stopped quilting after a little while and left it at that. I would unpick the quilting, but I think it’d make it worse, and anyway, it’s just for us. The throw is a really nice weight, perfect for a little reading or a quick nap.
And I’m all about celebrating imperfections. Otherwise this throw would still be remnants in the stash box. Hopefully my gifting friend won’t see this and gasp with horror 
Stay tuned for another natural fiber throw of a very different kind. And hopefully that overdyed silk dress will be ready soon. It’s allllllmost finished.
If you, too, have silk-sewing fears, here are some tips I found very helpful from Sunni of a fashionable stitch.
Have a great weekend!


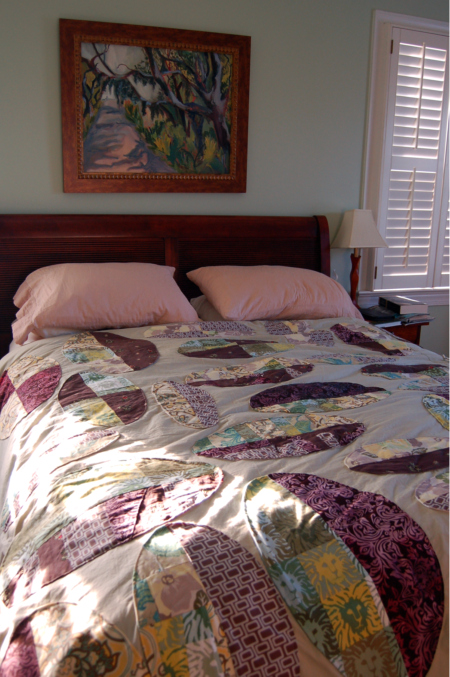
If you’ve been following this blog for a while, you may recognize this project. I started it a short four years ago. Four?! I finally finished it!! *Happy dance*
For those of you who are new (and btw, welcome new subscribers!) or don’t remember the project, it’s my take on an Amy Butler pattern in her book In Stitches. She calls it the “Patchwork Duvet Cover.” Mine is a bit different from the original pattern, mainly in the placement of the ovals and the background fabric.
This project took so long for many reasons. I got sick of it many times, and by the end I almost gave up because a) I wasn’t sure I liked the color scheme anymore and b) The oval appliques were giving me such a headache when I tried to sew them on.
My hubs wanted me to finish it, though, so I changed my machine needle and soldiered ahead, and now I’m glad. After putting it on the bed, the patchwork has grown on me, as out-of-favor crafty projects sometimes do. Here’s to perserverance!
For more info on this project in its earlier stages, check out this post and this one. The fabric was all upcycled, with the background made from twin duvet covers and the patterned fabric from thrift store finds, one of them over-dyed to suit.
If you want to see my other patchwork projects, check out this one and this one.
And oh yes, that painting is by yours truly. More info on it here.
Hope you had a great holiday weekend. I’ve had some unexpected sustained writing time, which has been great.


After more than six weeks of acute pain and terrible fatigue, after many holes in my arms and too many tests, the doctor has called with an explanation of what has gone wrong with my body. It seems utterly curable, but it will take a while (specialists must be seen, things must be verified, before I can start on any course of treatment).
I am just so grateful, tonight, for a probable answer. And I am especially grateful for
the quilt that arrived here on Monday, from my dear friend Wendy Robards, who must have known, all those months ago, that I would need her goddess comfort.
Oh, how I have been blessed by her goddess comfort. As I am blessed by all of you.
Thank you for putting up with me all these weeks. I plan to soon return to full fighting form.
If you follow me on Twitter of Facebook, you know we had a recent addition to the family. No, this is not my baby, it's my sister-in-law's baby. Introducing my new niece, Raiah (pronounced like Mariah without the 'ma').
Of course this much cuteness deserves a very special gift, so I decided to make a quilt. This is my first completed quilt. I still haven't finished my first pieced quilt which you can see
here.
I used fabric from my friend,
Bari J's latest line, Paris Apartment. I ordered it from
Fat Quarter Shop. This is the second time I'm making a quilt with her fabrics. I think I'm the president of her fan club.
I truly love this line of fabric. It's like she used all of my favorite colors! I also love that it features dressmaker's dummies in one of the fabrics. Perfect for my SIL, Tabi, who's very into fashion. I machined quilted it with random width lines of hot pink thread. I don't have a photo of the back where I used a leftover piece of Bari's Full Bloom Fabric, which worked perfectly.
I made this quilt big for a baby quilt. It's about 48" x 60". They grow out of baby quilts

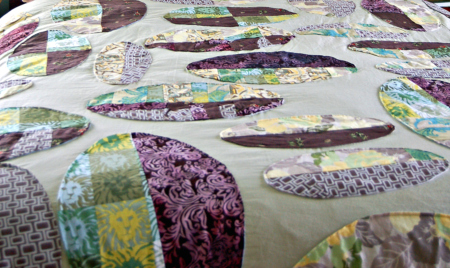
Still fiddling with these ovals, trying a new layout on for size before I start sewing the suckers down.
This project started out as a variation on Amy Butler’s patchwork duvet pattern. See an earlier post about it here. The original pattern calls for a patchwork background topped by these ovals, but I decided just to do the ovals on top of a plain light green background.
Last time I was laying these out, I was still following the general layout of the original pattern (see the earlier post), but that design minus the patchwork background seems too static to me. I’m liking this much better. What do you think? Of course you have to imagine away the navy blue because it will be light green in the end.
I’m not loving the colors as much as I did when I started, but oh well. I’m committed now, and I’m ready to finish this thing. I got really bogged down with the ovals because of some fabric shortage issues, which led to some creative piecing on the fly.
Meanwhile, I’m inching toward the finish line on the Cuppa Cuppa Patchwork. Stay tuned.
Also, I just started the Blogging Your Way e-course with Holly Becker of decor8. Looks like it’s going to be a good time.
Have a great weekend!


Whenever possible, hibernate with your best friend :)
A little something from the archives until I find time to make new art.
Happy Autumn!
xo
Lo♥
With the kids on vacation and one down with the flu, I gave up on getting any work work done and decided to tackle the quilt that has been in the making for a year or so.
I had most of the block rows sewn together and finished the rest quickly. I had planned a mitered border, but didn't really want to do it. I'd need my mom's help, but we couldn't chance exposing her to the flu. Luckily, I had just received Bari J's
Inspired to Sew
. She has a Sweet home Chicago quilt which doesn't have a mitered border. Hallelujah! That's all the incentive I needed. The border was a breeze.
I was very determined to finish the top and back this week, so when I couldn't find my original plan for the back and realized that I hadn't ordered enough fabric anyway, I got creative. I used leftover blocks plus added some new ones, scraps, and the fabric that was supposed to be a border. Oh well, that's a problem for another day.
I worked quickly and tried not to overthink it. I like the results. Next up, I'm off to Mom's to baste everything together. How to quilt it is not so easy. I love the idea of using embroidery floss ala
Anna Maria Horner or machine quilting it. I don't want to make a career out of quilting it. I want it finished!

By: Emily Smith Pearce,
on 1/26/2011
Blog:
Emily Smith Pearce
(
Login to Add to MyJacketFlap)
JacketFlap tags:
Art,
Sewing,
Crafts,
craft,
quilt,
thrifting,
Amy Butler,
patchwork,
applique,
Hannover,
Fiber Arts,
scrap quilt,
Add a tag

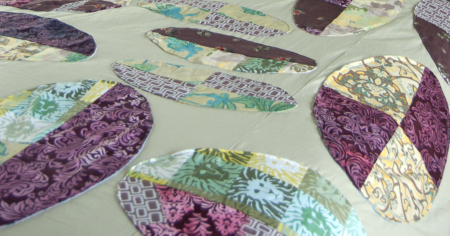
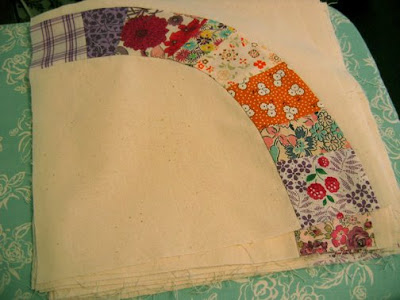
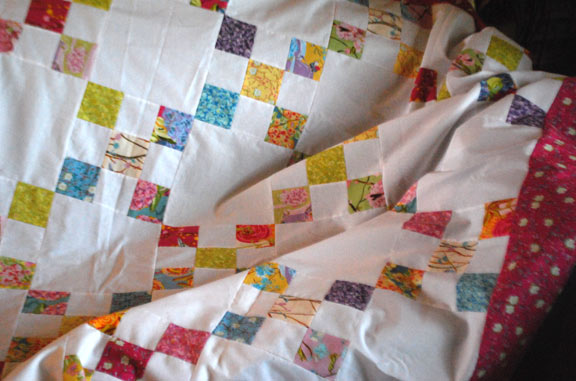
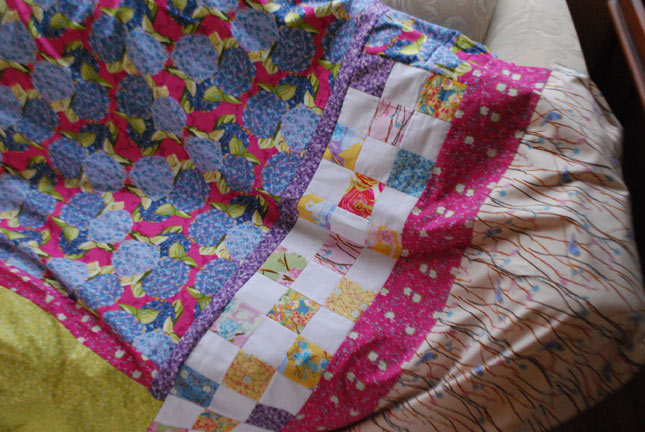
Here’s a sneak peak at another patchwork project I’ve been pecking away at for a long time. I’m feeling the need to finish these bedcovers lately, so hopefully I’ll have more to show you soon.
This patchwork pattern is a modified version of an Amy Butler design (Patchwork Duvet Cover) from her book, In Stitches. It started out as thrifted clothes I picked up on one trip to the Goodwill in Charlotte. Here’s an early pic:

I decided this print (below), though I liked it, had too much white to work in the design, so I used fabric paint to darken the white to a kind of purplish brown color. You can see the result in the first photo. It’s a watercolor-type paint, so it doesn’t change the “hand” (the feel) of the fabric much.
The oval appliques will go on a light green background when I finish the last few. I tried laying them out on white (top photo) but I didn’t think it worked so well. What do you think?


 |
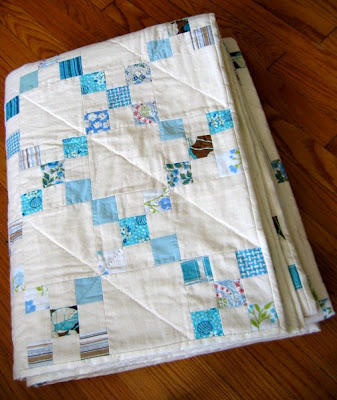
| This is my quilt folded, pretending it's finished |
So as I was saying, we only had a handful of trick-or-treaters. Possibly Bradley's jack-o-lantern was too scary? I will have to alert him to this issue.
But now, onto the quilting. I finished my second quilt top a long time ago, the Denyse Schimdt
Single Girl, but since basting it together, it has languished around being a big disappointment. This is because I made a few choices for it that I later regretted.
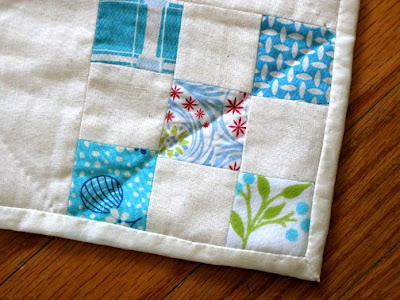
 |
| This is the hand-quilted part |
First of all I used muslin for the background, and once it was finished it suddenly seemed a bit drab to me and I wasn't crazy about it. I had considered a white cotton initially but it seemed too bright next to some of the vintage prints. So there's that.
Then I also decided to experiment and used curtain interlining for the batting. It's sort of soft and fuzzy and thinner than the other batting I've used so I thought it would be easier to do nice fine hand-quilting. Plus it was an inexpensive option. But once it was all pin-basted together the lining seemed to make the whole quilt sort of heavy and droopy. So there's that.
Then I decided that I would hand quilt it. As I expected with the thin "batting" I could do nice tiny stitches. I used the circle design suggested by the pattern. But once I had finished three rows I wasn't thrilled. It just didn't seem quilted enough, there were large areas that I felt would need lots more quilting. Which would take ages. Especially as I wasn't motivated to finish it since I didn't love my quilt anymore.
So enough complaining, because.. I've sorted it all out! I decided that I would cut my losses and switch to machine quilting. I decided on free-motion quilting because I have a darning foot already for my Bernina, and I don't have a walking foot yet. Plus I wanted to try free-motion. And I love it! I love the way it looks, I love the way it feels and I like the muslin now. Even the interlining seems right now, it's a thin quilt (which was the original plan, I like thin quilts) but with a nice textured feel. And it's so pretty!
3 Comments on Wonky free motion quilting, last added: 11/4/2010

I find the quilt-making process exhausting and yet every time I finish one (not that there have been that many times) I’m already thinking about my next.
Tim Burton’s Sleepy Hollow is a movie that has certainly grown on my over the years. (I know I’ve must have mentioned this movie before!) I love the production design, especially the costumes; Colleen Atwood can do no wrong. But in the last few years (I watch it annually around this time) I’ve changed my focus to something else: the quilt.

This quilt is one of the prettiest I’ve seen. The pictures are dark, I know, but I hope you can see what I see. This simple triangle pattern might be my favorite quilt design. I’ve seen this type of pattern more often in older quilts, like early and mid 19th C. What I find most interesting are that the triangle’s bases in one row do not line up with those of the next. (Unlike the example you can see here.) Instead the triangles themselves line up with the triangles in the second row over. (Sorry for the possibly convoluted explanation.) This pattern seems less common than the former, perhaps because it’s more difficult to keep all the rows lined up neatly without having the bases to match up.

Here you can see some detail. This is also proof that I’m a certifiable sewing nerd: “Folks, forget Johnny - LOOK AT THE QUILT!” Oh, I even love the shattered pieces and yellowing. Look at the blue piece by Johnny’s right ear, isn’t it lovely? (Gosh, I wonder how the art department found such a quilt. It looks like a genuine antique, doesn’t it?)

Another slightly more awkward image of Johnny, I mean Ichabod, on the quilt.
I’d like to make a quilt like this. I don’t know if I’d use feedsack or feedsack-like prints or something more Victorian. I’d probably use colors that are lighter and maybe a little brighter although I really love the ones used in this piece. Anyway, I don’t know when I’ll make this but I already have some fabric in my stash that would be suitable. I hope to start this winter.
In the meantime, I’ve got some frocks to finish up and share with you!
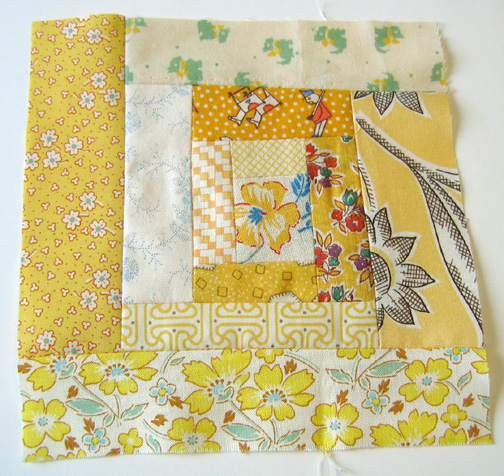
I've been wanting to make a yellow quilt forever. So just in time for the rainy days we've been having, I've finally gathered up the yellow prints I had on hand. I've never sewn a log cabin quilt square before, but I've read online that it's addictive. Now that I've made my first one I can confirm that it's true! I decided to do my cutting freehand, just making strips as I went along and not worrying about having them all be the same width.
I like the result. At the end I will true up each square using a cardboard template and then when I join all the squares my quilt won't be too wonky! At the end when I have a stack of squares I can arrange them before joining them together and make sure the quilt is balanced. I'm not sure yet whether I'll add sashing (extra strips between the squares).
As usual I have hoarded tiny scraps of my favourite prints, so it's been very nice to finally be able to use even the smallest pieces. Things have been busy lately so this quilt could go very slowly, but I've decided I'd rather just do a square at a time, and not cut it all out beforehand, and maybe even not do any chain piecing. I've found it very relaxing to just choose and cut a piece at a time and put it all together.
This square went together very quickly so I think you could whip up a quilt top this way in no time. For the quilt back I think I'll just keep an eye out for a vintage sheet with some yellow. My quilt is going to be so cheerful!
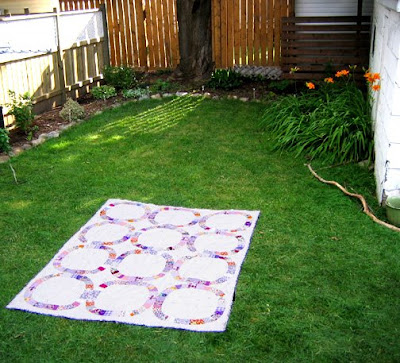 a glimpse of our new backyard
The "single girl" quilt is now assembled. It turns out I had only bought enough batting and backing fabric for the twin size so I couldn't make it larger after all.

I finished the piecing last week, then sewed together the back panel which is orange floral
My Folklore fabric
. Before assembling you can use the template provided in the pattern to mark the hand quilting lines. I liked the way the circles look so I did use the pattern.
Here's a picture that shows the hand quilting:
 I marked the lines on with a 2B pencil
I've done the bottom row of the quilt so far. It's a twin so it shouldn't take too long, except insofar as it always takes too long to finish hand quilting a quilt. I'm already thinking about my next quilt so I have to try to stay motivated to finish this one.
 I basted with safety pins this time, much quicker!
 A detail of the hand quilting stitches
 Sorry I've kind of gotten out of the habit of posting! But now my camera is back and working again. I've also been inspired to try to finish up my single girl quilt top. This stage is very satisfying, I've finished all the quarters, and ironed them and I now have a nice neat stack that just needs to be put together into complete rings.
So far I have 5 out of the 12 rings completed (shown above). This is the amount needed for the twin quilt. But I'd like to make the quilt bigger so I've had the idea to finish the quilt top as suggested in the pattern, but then add extra plain panels on the sides to make it wider. This way the rings cover the top of the bed, but the sides are plain.
I'll have to find some muslin to match the one I've been using if I go ahead with the side panels. The muslin was from a curtain, so I'm not sure if I can find more of it that matches. I'm not even sure if muslin was the best choice for the background. I figured the curtain had been washed a lot so there was no evidence of pilling but a quilt can take so long to make it makes sense to use top quality materials. Well it's definitely too late now!
 In case you're wondering, I finally gave up the hand quilting and finished up the quarters by machine. I guess it was nice having a portable project while we were selling our house. I had to put away my sewing machine for showings, and I was also getting kicked out of the house all the time. But now that we're settled in the new house I can leave my sewing machine out on my desk in my own workroom.
My thoughts now are that I prefer machine piecing for quilt tops but I still love hand quilting once the quilt is assembled. Although I do think I benefited from trying the hand piecing because it forced me to slow down, so the pieces are more accurate. Tiny errors can really compound so now I know I have to work carefully from the start in order to be happy with the finished result.
 So I've tried it out and it looks like I'll be hand-piecing the single girl quilt. I didn't sew the pieces together in the order it suggests in the instructions since I wanted to see a finished square and see whether I was happy with using the muslin for the background fabric.
Denyse Schmidt's Single Girl quilt instructions suggest sewing all the first quarter rings first, then all the second quarters etc. It makes a lot of sense to put together batches at a time and then you could also chain piece as well and save time and thread.
Part of the reason I went ahead with a full ring was that I had laid out the whole quilt and made sure I was happy with the prints in each ring. Mainly I was checking that there were no duplicate prints in each ring.
The rings are mainly all the same, except you substitute in a few different prints so the overall effect appears random. I had done that and spent some time making sure I liked the placement of my random prints. So I want to keep all the pieces for each ring together as I go along.
 Now that the first square is done (11 more to go!) I'm really happy with the results. When I sewed my last quilt I quickly machine pieced it and while I was fine with the way it turned out in the end I was a bit bothered by the way some of the squares didn't line up perfectly. In retrospect that was also about cutting out imperfectly - some of the little pieces of fabric I had were just slightly too small and I wanted to make them work.
So as I was methodically hand sewing my ring together I found I was able to line up the quarter rings almost perfectly. And I was thinking of a saying that my grandfather used to say from time to time: If something is worth doing, it's worth doing well.
This simple phrase haunts me. Anytime I do something in a rushed, haphazard way and I know it's not going to turn out as well as it could I have a sort of guilty feeling. I question whether it's worth doing, and if so why am I not doing it well?
So in this case I'm slowing down and I think it will be worth it in the end. Not that I'm against machine piecing! Not at all. I may very well go back to it for my next quilt. Which I'm trying not to think about so that I can focus on this one. But I will say the next one is going to be made up of yellow prints. I love yellow.
 The update on my quilt is that I've finally finished hand quilting the entire thing, but now I'm planning to add double the number of rows. There are diagonal lines of stitching through each full square, but I'm going to add extra rows so that each full square has an "X" in it.
In the meantime I decided to bind the edges so that while I'm working on it there's no risk of the quilt top pulling apart at the seams. Also it's satisfying to see it looking more finished.
 So I have a tip for a binding without bias tape or anything else. I'm not sure how to reference this, but basically I just saw some quilters on tv doing this on their historical quilts. The only difference is that their quilts were much loftier, and their borders were bigger.
 This is the view of the underside - there's no seam!
So what you do is use the bottom panel of fabric for the binding. Fold it up and over the top and hem it in place with mitred corners. Mine is about 3/8" wide. I decided to stitch it in place by hand as I knew I would never be happy with a machine-sewn finish and besides I had already gone to the trouble of hand quilting. I knew it might pucker or something and I'd just spend more time picking it out.
Of course you only need to stitch the top side, I used an invisible stitch.
Here's a close-up of one of the mitred corners:
While I was trying to figure out how to hand quilt I found this
helpful tutorial on youtube. I love that people take the time to make these movies to explain things.
And while I was at youtube I found these wonderful vintage Singer commercials:
She Caught on Quick,
Three Smart Daughters and
this one from 1956-8. My favourite line: "Of course I want a Singer, who doesn't?"
 First of all, no I didn't make this quilt. I bought it on ebay because I really wanted a vintage quilt, especially now that I'm working on one of my own. I've always loved them, but now that I'm making one I have lots of questions about all the details and I wanted to have one up close so I could sort of refer to it.
Then I saw this one and fell in love with it, I love the colour scheme with lots of white, and so many charming little floral and plaid vintage prints. Handmade quilts can be very expensive but this one was surprisingly not, and I think I know why. Vintage quilts seem to be valued on a few factors as far as I can tell, such as the overall condition and the evenness and size of the hand stitching. Patterns that are rare and especially one-of-a-kind are worth more. Quilts that have some history, such as a date and signature are in demand. Then there is the overall artistry, the way the colours and patterns work together.
This quilt is nicely quilted, but the stitches are a little uneven, the patches aren't perfectly aligned, and the stitches which seem so small to me are actually only 6-7 per inch which is good but not considered Expert. And this basket style of quilt is fairly common.
But these little flaws appeal to me, and helped me decide how I'd like my quilt to be. Not Expert, but still very appealing.
 Some of the patterns look surprisingly modern, but I think that's because everything old is new again these days and a lot of designers take their inspiration from these old prints. I think the 1930s is my favourite time for fabric. This quilt is so nice because when I'm in bed I can just gaze adoringly at all the prints...


 In the meantime I've started quilting my blue Irish Chain quilt... very slowly...
Read the rest of this post
In the meantime I've started quilting my blue Irish Chain quilt... very slowly...
Read the rest of this post

By:
Claire Louise Milne,
on 2/21/2008
Blog:
Needle Book
(
Login to Add to MyJacketFlap)
JacketFlap tags:
sewing,
crafts,
blue,
vintage,
prints,
quilt,
sew,
blue,
vintage,
prints,
quilt,
sew,
Add a tag
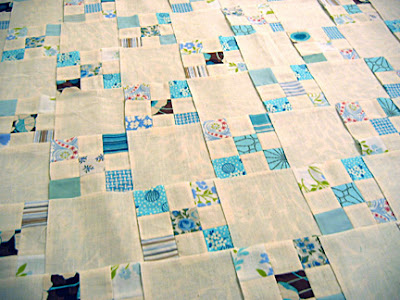
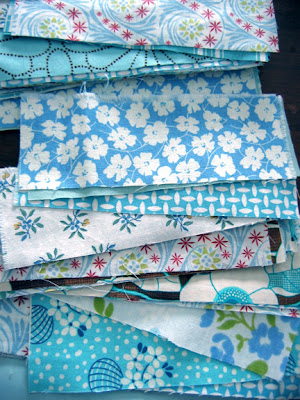 I started a quilt at the workroom a month ago by cutting out strips of blue patterned fabrics I had collected from my stash. I started cutting fabric before I'd decided exactly what to do, mainly because a quilt is such a big project I thought I should just start or I never would. I thought I might just do horizontal bars of the blue prints.
Since then I was re-reading Jane of Lantern Hill for the nth time and discovered something funny. When I was little and read the book she described her bed as a wooden "spool" bed and I imagined something shaped a bit like a wooden spool of thread, but shorter and wider in proportion. Reading it again now I realize that a spool bed is actually one with turned wooden posts, which is exactly what we have(this links to an old post that has lots of "before" pictures of our house too).
So when I came across her description of three quilts that her father gave her for their new house on the island I looked them up online. The one she put on her bed is an Irish Chain, and I decided that was exactly the pattern I would like to do for mine. It's fairly easy to make, and pretty and has that lattice look I like. Also I wanted lots of white in the background so all the prints wouldn't look too busy.
It's very simple. First I cut 6" squares, then divided each one into thirds, ie. 2" x 6" strips (below right). Then these are sewn together alternating the colours with plain white (below bottom left). You do colour-white-colour, then half as many that are white-colour-white. Each of these are then trimmed into thirds again (below top left).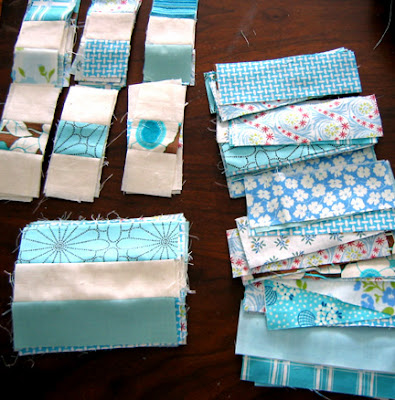 Then you piece together squares that look like a checker board. At this stage I trimmed each square again to make sure it was just the right size. These squares are then alternated with plain white squares. Once you put it all together, you don't see the checkerboard pattern, but a lattice, ie. diagonal lines of coloured squares. Especially if you kind of squint your eyes when looking at it.
I laid out all the squares onto a sheet so I could see how the quilt would look and Bradley helped arrange them so that there was a good balance of patterns.
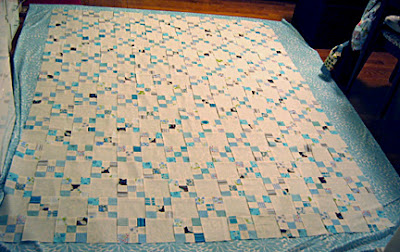 So far I've sewn together all the rows, and now I need to join the rows to each other to finish the quilt top. Which I'd like to do in time for the Workroom quilting Sunday and then I will work on basting the quilt top to the batting and backing.
 I say impatient because I've rushed through a lot of this and it's not as perfect as I'd like. Little mistakes tend to compound and the squares don't meet perfectly at the corners throughout as they should. I realized partway through that I should be using the hem guide that came with my sewing machine and it's made a huge difference. I've had to rework a few pieces to make them the right size, but it's going together fairly well now and will probably be nice once it's done. I hope!
Check out the Chicago Smart Museum. They've got a fun interactive art online site for kids to learn about art.


.jpeg?picon=2420)


Spaghetti! I agree. Pretty. though. I know you’ll make it work.
Thanks, Joyce!