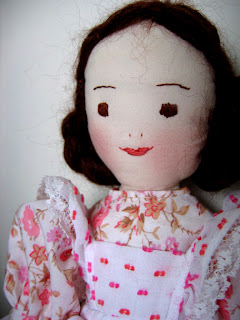
Posting again took longer than I expected, but since I did have one request I will show the progress pics of the hairdo for the Gail Wilson 3D doll.
First of all, please don't be afraid to start your kit! The best tip is to just start with the first step rather than overwhelming yourself trying to figure out the whole thing. And once it's done, go on to the next one. There are so many details in the instructions you will have lots of help.
Take your time, I did make mistakes myself and slowing down allowed me to fix them before it was too late. For example, I traced the body pattern pieces onto the fabric then realized when I got to the last pattern piece that I didn't have enough room. You really need to snug the pieces up to the edges of the piece of fabric (assuming you bought the kit with provided fabric) to fit them all in. The solution? I just turned over the folded piece of fabric and retraced them onto that side. No harm done.
So here's how I did the hair. I pinned the wool wig (wool has been machine sewn onto a bit of fabric at this stage) on her head to check the placement before gluing. Gail recommends a cool melt glue gun but I didn't have any trouble with my regular glue gun. If you're worried about burning your fingers my big tip is to just put a bandaid on the finger you use to press the hair into place.
Glue just a little bit at a time and make sure it's going where you want it to. The exact position of the hair kind of changes the shape of her face. If you glue it a bit high she will have a high forehead, etc.
To "comb" the hair I used a tiny knitting needle I had on hand - size 0000. I didn't want to buy a hair pick, and the needle worked just fine. You need to start combing low down or you will have big snags - if you've ever had long thick hair you know this!
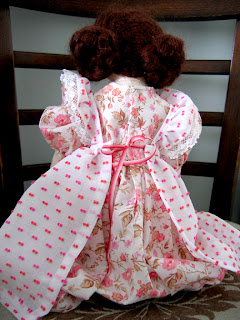
Here's a view of the back. You want to make sure your wig is low enough at the back so she doesn't have a big bare area on her head. Another tip, I saved the fibre that was pulled out and combed it and made a wig for my
.

It’s that time of year again, when little huts like this pop up all over the Hannover. I love the way seasonal produce is so easy to find. No trouble locating this vendor. Often an erdbeer-hof also offers spargel (asparagus, usually white) since it’s in season as well.
Along with strawberry season comes the annual Waldorf school bazaar. This time I was a contributor to the crafts table, and a salesperson, too. I was pretty proud of myself for handling a few simple transactions, considering that I had to speak and count in German plus make change in Euros. Simple things, but put all together it was a little challenging. Sorry the picture is a little backlit. It was hastily taken with the cell phone, as a lot of these were, since it doesn’t seem to be the norm to snap a bunch of pictures at Waldorf events. I wanted you to see a bit of the arrangement, though. I can’t take any credit for it, but it makes me want to buy the entire menagerie every time I see it.
That crazy blue thing in the upper left of the picture will be explained later.

Below are some of what I made, in addition to the little Waldorf men I blogged about earlier.

Hot sellers, these little bunnies.

They are made of felt, blanket stitched and stuffed with actual wool, with needle-felted tails. I had never needle-felted before and always sort of regarded it as a craft that must take a lot of training to do properly. It’s really easy, though, at least to do bunny tails. I was shocked. It almost seems like magic. Below are some more felt animals and figures, not made by me.

And here is my needle-felted doll, my first needle-felt project. The blue thing hanging from the top in the earlier picture is also a felt doll.

Here’s a little of my delicious Waldorf lunch from the bazaar. No Waldorf salad. Ha! There were bratwurst, too, but the salads were really the star of the show.

And here, an only slightly-related photograph, of
So Mary Poppins put on her white gloves and tucked her umbrella under her arm–not because it was raining but because it had such a beautiful handle that she couldn't possibly leave it at home. How could you leave your umbrella behind if it had a parrot's head for a handle? Besides, Mary Poppins was very vain and like to look her best. Indeed, she was quite sure that she never looked anything else. --Mary Poppins by P. L. Travers
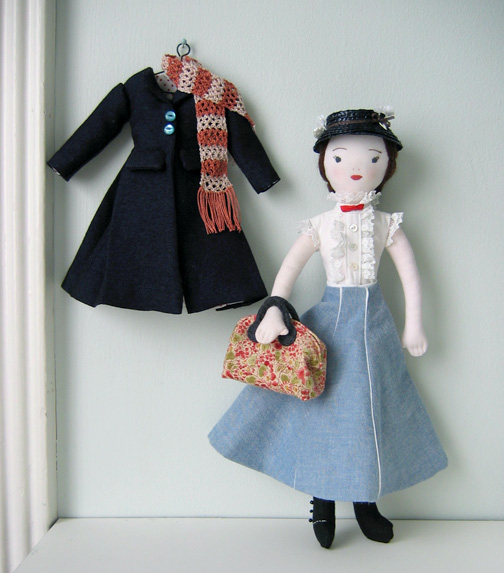
I've finally finished the Mary Poppins doll. Well except for the umbrella... I'm still thinking about that. Don't worry, I do know it's important.
Of course I made a few changes, so I will show you the details. From the top, I absolutely love how her hat turned out. The pattern has a hat sewn from felt but I had the notion that I would like to make a straw hat for her.
Then one afternoon I just happened to be in a dollhouse shop in Cambridge (as part of a birthday treat day trip that included my favourite flea markets). And I found a tiny packet that had very dark navy blue miniature hat straw braid. There was only one colour, only one size and it was absolutely perfect.
So I looked it up online and sewing up a straw hat is pretty simple in the end. You can look it up yourself and find a tutorial that suits you, but the main tip, the thing I didn't know before, is that straw hat braid has a thread inside it that you can pull so that it curves.
The hat band is a tiny brown scalloped trim that was described in the dollhouse shop as "fairy lace". Now how on earth could I resist that?? Then I added some tiny white flowers I had already which I trimmed to look more like daisies.
The scarf was crocheted from pearl cotton with a tiny crochet hook. I matched the colours to the movie scarf rather than the pattern suggestions. That was a very finicky job that took a long time but as I often do I just worked on it while watching movies in the evening.
The boots are meant to be made from felt but they just turned out too bulky. So I copied the foot pattern and sewed it from black cotton fabric, hemmed the top, then embroidered the scallop edge and added the tiny black beads for buttons. The foot for this pattern has a funny shape but it's kind of charming in a way so I kept it that way.
![]()
 |
| I added MOP buttons to the blouse after finding some truly tiny ones |
While I'm also working on larger things - right now it's a wool jacket adapted from a coat pattern - I also keep getting drawn back to the small. In this case, a lovely doll pattern that I've had for years. It was tucked away and I just never seemed to find the right moment to start it.
You know who she is, right?
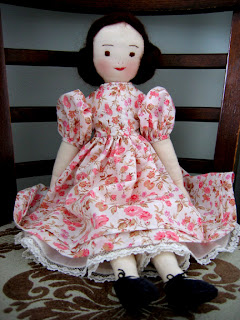
This pattern fascinates me because there are so many details. There is the doll, of course, with an elaborate hairdo and embroidered face. There are darts in the back of her head that make her head nice and full when stuffed. Then there are the clothes, which include a lace trimmed pettiblouse, lined skirt with tucks and piping detail, stockings, boots, a bowtie, coat, hat, mittens, scarf and last but not least, a carpet bag (that last one surely gives her identity away).
 |
| pettiblouse still needs more snaps at the back and lace at the bottom |
I managed to complicate things by deciding to make the coat from fabric (with seams and a lining) rather than plain felt (with no seam allowance). And the yarn hair turned out a bit longer than the instructions required so I added the braids to her bun. Also, I wanted a smaller doll so I reduced the pattern to 70%.
But even without that this pattern is a lot of work. I love to think of some parent slaving away at this in the evenings in order to create what I would consider the best present EVER.

Another toasty day in L.A. I’m in my workshop examining felt samples, cutting yarn hair (and keeping track for pattern writing), looking at fabric pens online and trying to keep cool with coconut sorbet and iced tea.

Here’s another Lucy doll. I think I’ve perfected the cheeks, finally. I really love this vintage print I used for her dress, don’t you? I’m also planning another doll pattern, Lucy’s sister: one you can dress up. (Of course, she’ll have her knickers on!)
OK, time for a late lunch. Have a great weekend!
As I mentioned in my last post, I've been looking forward to making this sweet pair of Edith Flack Ackley dolls ever since I saw the picture advertising the pattern. This vintage pattern makes a surprisingly small pair of dolls. Well, I was surprised, but also delighted by how nice they are. Also the clothes are removable which I always prefer.
This picture with a teacup gives you an idea of their size.
Like my previous EFA doll, these have a dress, petticoat and pantalettes. The pattern also suggests a necklace and I thought it would nice for them to have matching glass bead necklaces.
If you're thinking of making this pattern yourself I did make some small changes. First of all the pantalettes seem very wide so you would probably want to reduce those - just shave off from the side of the pattern (thanks to Margaret for that tip!). Also the petticoat is not as wide as the skirt so you could make it wider if you want it to be fuller. On the other hand as the doll is so small this can make it bulkier around the waist. For the dress I found the front bodice to be a little wide so I tweaked that too.
Don't be discouraged part way through once you've turned the doll right side out and it seems pathetic and too narrow. Once you firmly stuff and stitch at the joints the doll has a very nice shape. Also I recommend FrayBlock at the areas where you need to trim the seams very closely such as under the arms.
I made a few little changes just to suit me. For example the pattern suggests drawing the shoes on with ink, but I ended up sewing fabric directly on the foot to make the shoes. I thought the wool felt I had on hand would have been too thick. I also stitched a little seam on the arms, just once, so that they bend at the elbow. Just little changes like that.
I love how they turned out and must thank
Margaret once again for kindly sharing her pattern.
 |
| To Greet a Little Girl - my 1st EFA doll |
Another long time to-do item for me was to make a doll from Edith Flack Ackley's wonderful 1938 book,
Dolls to Make for Fun and Profit. This book has a lovely collection of cloth dolls to sew charmingly illustrated throughout by Edith's sister Telka Ackley. I've had this book for a long time but didn't get around to making any of the dolls until now.
 |
| detail of her embroidered features |
One thing that's refreshing about the book is that Edith encourages her readers to make the dolls to sell themselves. It's something I'm considering but I've found after making this first one that they're quite time consuming to make if you're fussy like me, and want the clothes to be removable and the hems finished by hand etc. This particular one has six garments, an undervest, pantalettes, petticoat, dress, pinafore and shoes.
 |
| back view |
I joined the Yahoo group (edithflackackleydolls
), which I recommend if you're interested in these dolls as you can see all the great photos of other dolls made by people in the group. That's also where I found the pattern for this doll, called "To Greet a Little Girl". The book has patterns as well but this one was nice and complete with more specific instructions. I always appreciate it so much when people take the time to share things like this!
 |
| the dress without the pinafore |
I was inspired by Margaret McInnes' beautiful "Belinda and Lucinda" dolls made from a EFA pattern from 1934. Margaret was kind enough to share her copy of this pattern which you can find on her blog:
5 Comments on First Edith Flack Ackley doll, last added: 3/18/2011

Here’s my latest Lucy doll – sans arms. (This Depression-era reproduction fabric is my current favorite from my stash.)

And here’s Spoo Kee getting a steam facial from our portable dishwasher. This is a ritual for him. Spoo suffers from sinus congestion and he’s discovered the warm steam helps him feel better. (At least I like to think this is why he does it; that would also mean he’s crazy smart to make that connection!)
 Sometimes he’ll even rest his head on the open door. Too funny.

By:
Gigi Moore,
on 8/26/2010
Blog:
Gigi's Studio
(
Login to Add to MyJacketFlap)
JacketFlap tags:
rollacoaster,
illustration,
doll,
animals,
children's illustration,
digital,
Children's Illustrations,
balloon,
fair,
polar bear,
lollipop,
popcorn,
tent,
ferris wheel,
Add a tag

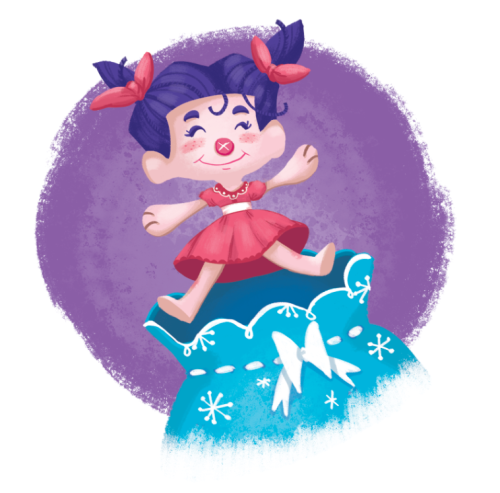
Hot weather + hectic weeks have made making friends for Lucy a wee bit difficult but not impossible; luckily dolls are very patient. But I suppose you have no choice when you don’t have arms or a painted-in face. Oh, and your little midi collar (or shawl, I can’t decide) is missing.
SPEAKING OF SHAWLS, I plan to make at least one chicken shawl for my friend Kara’s new chickens!! I’m head over heels excited for her and even a little envious because how could you not want your very own chickens?
Have a good Wednesday, dears!

It’s a perfectly dreary, drizzly day; not good for photo-taking but just right for hot chocolate (which I’ve already had) and split pea soup (which I plan to make for lunch). Regardless, I snapped this photo of my latest creation, a rag doll named Lucy!
Drafting a pattern for this doll has been a surprisingly slow process. It was important to me to make this doll from scratch and while I felt like I was reinventing the wheel at times, it’s satisfying to finally get the proportions down. My doll-making supplies box is full of forlorn and random limbs, which is both a little creepy and amusing. But finally something just clicked and I drew up these plans rather quickly.
And the hair is completely experimental - how does it look? It’s a mohair/silk blend yarn from Rowan. And painting on fabric - did you know? It’s FUN.
Like with my Leda softie pattern, I’ve looked to old-fashioned dolls for inspiration. Lucy looks like something you’d find in an old chest in the attic, amidst bone china teacups, lace collars and tattered school primers.
I think Lucy needs friends now, don’t you?
Happy Thursday dears!
Call it wishful thinking, but I've decided to have a little Spring Giveaway. It's actually in honour of my 400th post! I can't believe I've written that many, what on earth have I been nattering on about?
Anyway, just in case you think I don't appreciate my readers, here's the giveaway. It includes a set of my bird sketch notecards, a wee pincushion made with the sweetest Japanese deer print:
and a one-of-a-kind peg doll:
She has a little feedsack skirt with lace trim, a brown knitted sweater, and a purple wool felt kerchief with tiny pink button.
All this cheerful Spring goodness for free, just leave a comment and I will pick a winner on March 15th. Please include your email address in your comment so I can reach you if you win.
p.s. I haven't put any of these pincushions in the shop as they are too fat to send letter mail, so they cost $6 to ship. Which is silly because they are only $5 to start with. So if you'd like to add one to any
Needle Book Shop purchase just send me an email or etsy convo.

Better bust out your best chonklit ceegars, as something Eddy this way comes! There won’t be a dry seat in the house when you feast your eyes on this mischievous little tramp. Drawn! contributor S.britt’s (say, that’s me!) friendly toothless urchin, Eddy Broth has now been put up for adoption.
This comical and cuddly doll is just the thing for you to play with, sleep with and love forever. So much like a real friend, you’ll hardly notice the difference. Looks and smells just like an actual orphan! Eddy has a soft cotton body, a big happy smile and several outstanding warrants. Each wears a bright felt t-shirt featuring one of three delightful phrases and one sad cry for help. Give him a hug but never turn your back on him. Wouldn’t you like a friend like Eddy?
Each 16-inch Eddy is hand-signed by the artist and comes with a Best Friend Membership Card and free decal! Handmade in the U.S.A. Get yours today!
Posted by Stephan Britt on Drawn! The Illustration and Cartooning Blog |
Permalink |
No comments
Tags: best friend, doll, Eddy Broth, Etsy, orphan, S.britt

A spoonful of creativity a day
Day 7
And another teaspoonful today. The holiday and a long bike ride curtailed the creating today, but we had a lovely day and it was well worth it.
So, today, Little Red got a new pair of boots made from red felt and some cute buttons:
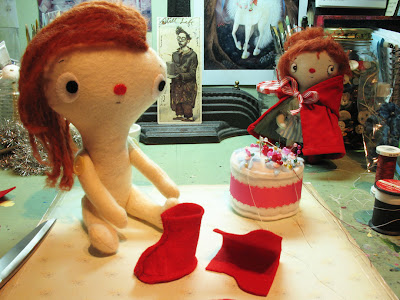
And a skirt made from a cuff of an old shirt. I think my original Little Red who is looking on, approves:
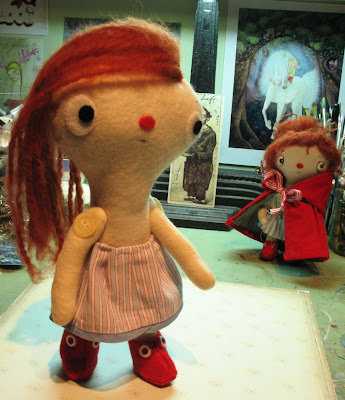
Next, a top and of course, a red cape...
View Next 7 Posts


.jpg?picon=572)


.jpeg?picon=2420)


I love this idea of using roving instead of yarn for the hair! This will totally revolutionize my doll-making.
hahaha this is the cutest!!