
For those of you more interested in making pretty Valentines with your kids than the humorous bodily-noises variety I featured in yesterday's post ( here), I bring you a technique that's: - relatively easy (though a tad time-consuming),
- relaxing (a good project for while you watch TV or chat with friends/family),
- versatile,
- inexpensive, and
- impressive-looking
It also goes well with chocolate! What more can you ask for? (I apologize for the blurry photo above. It was the only one I had of a quilled Valentine I made for a friend last year. I nearly always forget to photograph our Valentines...) Although I'd fooled around with quilled pictures as a kid, it was an article on breathtakingly beautiful quilled Valentines in a February issue of Martha Stewart Living a few years back that sparked my interest in trying it again. You can still find step-by-step descriptions of the how-to, as well as suggestions for an assortment of quilled Valentine crafts on her website here. I'm not going to repeat the full how-to since I don't think I could do it better than Martha, but I'll outline the materials and basic steps I used to make the Valentine above. Then you can make your own version - one of the great things about this craft is that you don't have to be a confident artist to come up with your own lovely designs or make something that looks remarkably polished. Materials and Tools- Paper To make the Valentine above, I cut strips from bright copier paper and lightweight cardstock. (You can purchase special strips in different widths intended for quilling, but they tend to be expensive. Since uniformity is not crucial for this project, I'd go cheap.) You'll also need a piece of heavyweight cardstock or a blank card for the background. If you don't have colored paper, don't fret: white-on-white quilling looks elegant.
- Paper cutter Or a ruler and steady hand to make your strips. (Or quilling paper already in strips.)
- Scissors For adjusting length and fringing. It's nice to have decorative scissors that scallop the edge before you fringe, but they're not essential
- Glue Ordinary white glue is perfect. (I apply it sparingly with a toothpick.) A glue stick can work too, but may not hold some of the heavier blossoms.
- Curling tool You can buy commercial quilling tools (see here), but a skewer or skinny knitting needle works pretty well too. (Inna Dorman on her interesting kids and craft blog Inna's Creations also has instructions for making a simple but effective quilling tool here.)
- Tweezers (optional) Help keep glue off your fingers and creations, but not essential unless you're working very small.
Steps- Make a heart "frame" I used my paper cutter to make a long strip of 1/4" cardstock, folded it roughly in half and then curled the loose ends toward each other, glued them together, and bent them into a loose heart shape. I applied glue to the edges with a toothpick and arranged the heart&nbs
 | | Valentine for his classmates. By my son at age 7 |
The Valentine above almost got my son kicked out of school. Long time readers of my blog as well as my unfortunate offspring will know that I have rather rigid rules for school Valentines. (See this previous post for example.) - First, you must give Valentines to ALL your classmates so as to avoid hurt feelings.
- Second, and this is the even more important one: no crap TV character ones from Walmart. You have to make your own.
These rules resulted in my children creating exquisite works of art that I will treasure forever. Ha ha ha ha ha ha ha ha ha ha ha HA! Okay. The truth. What they resulted in was a bunch of crap "homemade" Valentines. Usually wonky construction paper "hearts" slathered with strange assortments of stickers, stained with tears shed during the inevitable frustration tantrums, and finished with lollipops taped to the front obscuring their signatures. If they bothered to sign them. But at least the cards didn't have TV characters on them... That was until I discovered the six secrets to getting boys involved in public declarations of love (or at least sort-of-liking). - Let them use normally off-limits equipment in my studio, like the fragile light table or dangerous xacto knives
- Encourage them to incorporate their current passionate interests
- Assist with the boring parts like signing their names, putting the cards in envelopes, and addressing them (by "assist" I mean "do it for them")
- Incentivize frequently with samples of the candy included with the cards
- Maintain low quality standards
- Have them write love poems
The first five secrets I figured out on my own. The last one, though, is thanks to their wonderful kindergarten teacher, Ms. Frey. She introduced them to classics of love poetry like: "I love you, I love you,I love you divine.Please give me your bubble gum.You're sitting on mine."The Valentine featured here took my fine-motor challenged child hours and hours to make. Not to mention the ages he spent creating the verse. In the process: - I let him use my light table (which is how the writing is more or less in a straight line). Also I let him use the xacto knife to slice a piece of scratch paper to shreds, even though that had nothing to do with his project.
- I let him incorporate his current and longstanding interest in loud burping.
- I allowed him to sign his name only once and then photocopied it. And I did all the stuffing and addressing.
- I fed him lots of lollipops while he worked. Lots.
- I mentioned the lack of rhyme in his rhyming verse and the half-finished border around the heart only once and didn't say another word when he insisted he was done.
- I laughed - genuinely - at his funny poem and drawing. Actually I rather liked the absence of the expected rhyme. It was another little touch of humor (though I'm not certain it was intentional).
Then I sent him off to school with his packet of Valentines. Where the room mother at the
Hope you have a day filled with treats and only nice tricks! I'm planning to start blogging here again - I've missed all of you.
This post also appears on my group writing blog, Route 19 Writers.
 | | Illustration by Arthur Rackham for Wagner, Richard (translated by Margaret Amour) (1911). Siegfried and the Twilight of the Gods. London: William Heinemann, New York: Doubleday. Public domain image obtained through Wikimedia Commons via Haukurth |
Over the years, children's books have battled many dragons: censorship; competition from TV, video games, the internet, etc.; slashed library and school book budgets; changes in bookselling; changes in publishing. Oh! And horrid picture books by celebrities. They sometimes emerge from these battles a bit singed or bloodied, but emerge they do. Then a few years ago, another threat quietly crept into the children's book world and threatened catastrophe, especially for libraries and fans of vintage books. In 2008, in the wake of recalls of popular toys (made in China) for high lead levels, Congress nearly unanimously passed a law intended to protect children: the Consumer Product Safety Improvement Act (CPSIA). This law, among other things, required that ALL children's products aimed at kids 12 and under be tested and certified to be (basically) lead-free. Lead is a known neurotoxin and children are especially vulnerable. Sounds like a good idea, right? Well, the devil is in the details, and unfortunately the law failed (among other flaws) to exempt zillions of products that pose no significant threat to children. Like books. Which have NEVER been implicated in a single case of lead poisoning. Not only did the law require expensive testing of each of the components of new books (which would have driven up the cost with no increased benefit to kids), it was retroactive, requiring testing and certification of previously published books. Here's why this was terrible for libraries and used books: - Testing is terrifically expensive (and hard to obtain) and libraries and used sellers were required to test every children's book in their collections or for sale.
- The mandated testing is destructive testing - which means after submitting a book for testing, the library or bookstore would no longer have the book to circulate or sell.
To make things even worse, the Consumer Product Safety Commission discovered that a handful of children's books published before 1984 contained lead in excess of the new stringent limits. In some colors. On some pages. Never mind that a child would have to eat hundreds of books before raising his blood lead level noticeably, the law was inflexible, and the CPSC banned the sale or distribution to children of books printed before 1984. Fearing lawsuits, some libraries and many used sellers did remove older books from their shelves. But the reason your local library may not have a nearly empty children's department is that the CPSC has issued a variety of stays of enforcement and temporary exemptions (plus there are bunch of feisty and renegade librarians out there) - but all these stays and exemptions were set to expire at the end of this year. And every attempt to amend the law or repeal it has failed. Until this week! Here's the start of the
0 Comments on Children's Books Spared from Lead Law's Axe! Hooray! as of 1/1/1900
When I was a kid, my favorite part of Valentine's Day was not candy, getting tons of mail, or finding out that someone I liked liked me back (though of course I loved all those things), but making my Valentines. I spent weeks before the big day dreaming up different designs and then troubleshooting construction problems (my Valentines always had some complicated paper engineering thing going on, with windows or doors that locked with a lollipop stick, folded paper springs that made hearts pop out when someone opened the card, or other pop-up features). And then there was the making phase, parked at the kitchen table with my mom and sisters and piles of construction paper, doilies, and gobs of old-fashioned paste. I have conveniently forgotten the temper tantrums that traditionally accompanied my over-reaching projects. The happy memories are no doubt the reason I often spent every February 13th when my kids were young once more parked at the kitchen table with mounds of craft supplies trying to coax my craft-indifferent sons to make their own Valentines too (and then staying up late finishing them up when the boys abandoned the project midcourse and I couldn't bear to think about some poor classmate being left out). Fortunately for me, my daughter was a different story. She liked to make things too. And still does to my everlasting delight. The little matchbox Valentines she made in first grade remain one of my all time favorite Valentine projects. (The little love bugs inside were NOT my favorite - too fiddly for little hands.) These Valentines were also a favorite of my middle son's, because not only did he do something similar, albeit simpler: I let him keep the giant ziplock bag full of the matches we dumped out of the sixty-some little matchboxes! Which was a LOT of matches.He spent the next zillion summers constructing elaborate if rather wobbly structures from the matches and glue and then setting them alight (under adult supervision, in the driveway, on low wind days with a bucket of water handy, but still). I am a terrible mother obviously. These are very simple Valentines to make, possible to do at the last minute if you have a spare box of matches handy. Simply cut a paper strip long enough to wrap around the box, draw a design on the front (my daughter designed four different buildings - the flower shop and house shown at the top of this post, and I thi
My goodness, there has been a lot of Christmas-time paper cutting at my house over the years! Here are some more paper cuts that we've done in years past - some by my kids, some by me - with a snow/winter theme. I'll add some hints for making your own.
The snowmen above were part of a large quantity of paper bag papercuts we made one year to adorn our packages, which were wrapped with either plain white or plain red paper. One of my kids did the cutting for the one above, following a free hand drawing on the back side of the paper. It was cut on a fold (sort of paper doll chain style, only with just a single repeat). I used the lightweight paper bags the kids took their lunches in - they have enough body/stiffness to cut cleanly, but are light enough for small hands to get the scissors through two layers easily. The eyes and buttons were made with a standard circle hole punch. I let all my kids graduate to real scissors (often Fiskars embroidery scissors) at a relatively young age (6 or 7) and just supervised their cutting. No one ever got hurt, not even a smidge, though my guys did not have especially good fine motor skills. (I think kids are sometimes more careful when they're using real tools - and the results are definitely superior.)  The house above is basically the same method, but a single picture with no fold/repeat. Also cut by a child (though I may have cut the windows - don't recall). For interior cuts (like the windows and door), I usually (re)folded the paper so the kids didn't have to poke scissors into the middle of the paper to get the window or whatever started. Afterwards, I ironed the paper cuts on a low setting to get out the folds. (You can even mist kraft paper lightly to steam it and make it smoother.)
This was our Christmas card one year. I apologize for the crappy image - my cheap scanner seems to have a tough time with hard edges and it's made them look all uneven, which they aren't in the original. I cut this one, using a craft blade rather than scissors. The papers are thin origami papers, though a heavier paper likely would have worked equally well. What I like about it is that the polar bear is a negative - I cut away part of the blue paper to leave the figure. The moon and stars are also negatives. It's somewhat trickier thinking the drawing through - and also harder to cut
 | | First book in the series of five, first published by Delacourt in 1951 |
Poop! I started writing this ages ago and meant to get it finished while it was still Hanukkah, but life is hectic these days. Well, it's not too late really, because these books, although they center around a Jewish family, also make fabulous gifts for Christmas, birthdays, and other present-giving occasions. They're universal, timeless, wonderful. ( If you can track copies down - only the first seems to be in print still, though some of the others are available new as audiobooks.) When I was a young child during the early 1960s, I knew little about the Jewish faith or holidays - even though I now realize one of my best friends was probably Jewish (her mother was a Holocaust survivor). My family, though not religious, celebrated the standard Christian holidays, and at school, we only discussed and celebrated these Christian holidays or the official American ones like Thanksgiving and Memorial Day. The local stores and my community then (Arlington, VA) only decorated for them too, and so if there were Jewish kids in my midst, it just didn't come up. In short, there was little to expand my cultural knowledge - except books, which I was lucky enough to have in abundance.  | | The Stair-step Sisters checking out library books in an illustration by Helen John |
The All-of-a-Kind Family books by Sydney Taylor introduced me not only to a Jewish family and the special days of their faith, they transported me in space to the Lower East Side of Manhattan and in time to the turn of the 20th century. But however long ago, far away, and set in a different culture these stories were, the characters rang absolutely true to my life and family. Although there were only three girls in my family rather than the five in the books, my sisters and I were also stair-step siblings with similar squabbles, alliances, and shared experiences - and a warm, close family. I particularly identified with Sarah, who, like me, was the square-in-the-middle sister, and who, also like me, wanted badly to be a good girl, but fell short periodically through carelessness or stubbornness. (I was particularly glad to learn recently that the author, Sydney Taylor, was actually the Sarah of the books, which were based on her own childhood and family. She changed her first name during high school - kind of like I did for a while during junior high when I added a fashionable "e" to the end of mine.)
 | | Not-big-enough paper shoe - Needs more room for chocolate |
My tutorial for making paper shoes for St. Nicholas Day is probably my most popular post ever, which kind of cracks me up, since I hadn't imagined there would be much demand for such a goofy thing as a paper shoe. It's so popular that this cool online magazine, InCulture, asked me if they could reprint it this month as part of their holiday issue. You can find it here - and check out the rest of the magazine while you're at it. Lots of interesting articles on multicultural issues for kids and parents. Anyway, I've recently learned there is an even greater need out there: a tutorial and template for a paper boot! Because boots are also traditional to put out for St. Nicholas Day and well-worn ones tend to smell even worse than used sneakers do, if that's possible. More importantly, a paper boot can hold WAY more chocolates and other goodies than a paper shoe can. That's a need I can appreciate.
I didn't really have any idea how to make a paper boot, though, so I turned to my smartest, most trusted friend: Ms. Google.
And she let me down. The only templates/examples I could find for paper boots were really lame. In particular, they failed on the most important characteristic of a paper boot: capacity. This is because they were basically boot-shaped envelopes.
I have limited footwear engineering skills. Really, that paper shoe pretty much exhausted them. Though I do have these really, really cool vintage-maybe-antique children's shoe "lasts." (See, I even know the technical lingo.) They're iron and really, really heavy.  I bought them at an estate sale recently, even though I have no intention of becoming a shoemaker and don't have young children anymo
This is a paper doll based on the star of my book Mimi, which I first posted last year in a longer piece about the holiday (complete with book recommendations and latke recipe) here. I've colored the sheet with colored pencils (though unfortunately it hasn't photographed great and scanned even worse...) Anyway, as a gift for the first day of Hanukkah, I'm going to offer some tips on coloring for young artists. Below is the uncolored page, which you can dowload and print as a pdf here. By the way, I apologize if you tried to download this or any of my other free printables recently and got asked to pay a monthly subscription fee to Scribd first. Apparently they were trying an "experiment" by asking people to subscribe in order to use "archived" documents (which they defined as anything that had been on there more than a couple months). They didn't notify users, so I didn't realize. But I've now changed my settings and you should once again be able to download all my printables for free. Sorry! Tip Number One: Use the Best Quality Supplies You Can One thing many people don't realize is that the kind of colored pencils marketed for kids are, well, lousy. If you are lucky, you'll get even a small set of artist-quality colored pencils, like these ones made by Prismacolor for Hanukkah or Christmas or whatever holiday you celebrate. As you can see, good supplies are much more expensive than the kid-quality ones - the smallest set of 12 pencils is $10 US at 50% off at the above retailer - but they are totally worth it for several reasons. First, they work better which enables kids to produce a better final product which encourages them in turn to work harder and longer at their artwork. Second, kids are more likely to take care of and keep track of something that is special and valuable; this te
We celebrated Thanksgiving a day early this year because my oldest decided at the last minute to spend the actual holiday out of town with his girlfriend and her family. That left Wednesday as the only night we'd be all together. It was so nice having our big meal on Wednesday evening that we're thinking about making it our new holiday tradition; we've spent today relaxing and playing games. It feels to me much more like an extra long weekend, since we don't lose Thursday to all-day food prep, eating too much, and cleaning up. I simplified the menu a bit because Wednesday's busier and I hadn't even baked pies or anything. But I also benefitted from having two of the kids already home from college and work to help out yesterday, so it wasn't too bad getting everything together.  My daughter decorated the table, using Japanese maple leaves she'd pressed and an odd assortment of ornaments and candles from family childhoods, like the Thanksgiving candles my husband has used as long as he can remember and the funny little clay pots all three kids made for their kindergarten Thanksgiving feasts. We had a turkey breast rather than a whole turkey again this year; I finally realized that since no one in our family especially likes dark meat, it was silly to wrestle with gizzards and trying to get the dark meat cooked adequately without drying out the white meat when we could just buy and cook (much more quickly) the part we all like best. Doh! For a couple of years, I bought breasts from Costco that came packaged with a really delicious glaze. Costco stopped carrying that brand and I was feeling sad about the glaze again last night when it suddenly occurred to me to just look up a recipe for a similar one. Doh! again. I found a recipe that seemed promising here, but I was missing some of the ingredients. The recipe that follows is my improvised version. I also added extra liquid to the leftovers to make a sauce that could substitute for gravy (I have one kid who eats gluten-free, which makes things like gravy challenging.) Anyway, it was so good, I actually wrote it down at the urging of the whole family so I'll be able to recreate it again.
Twenty-one years ago, shortly after moving to Mt. Lebanon, Pennsylvania (a Pittsburgh suburb), I was wandering around my neighborhood with my one-year-old son in a backpack when I met another mom with her young son in a backpack. We shared a nice long walk that afternoon -- and have been walking together ever since. Mary Lou and I have covered a lot of ground, both literal and figurative, in the intervening years. Monday through Thursday evenings most weeks, we log five brisk miles over hilly terrain, usually close to home. On Saturdays, we frequently hit an estate sale somewhere not too far away and walk the surrounding neighborhood afterward. But our Sunday morning walks these days are my favorites. A few years ago, we decided to walk every street and alleyway in our town. It took nearly a year of Sundays to finish Mt. Lebanon - and then we branched out into surrounding communities. In the years since, we've covered a good many neighborhoods all around Pittsburgh, and I've learned more about my city from our hikes than I'd learned in the fifteen years plus before that. We especially enjoy cemetaries, the steep hillside neighborhoods where steps often replace sidewalks, and the quirky older communities with interesting architecture and mature landscaping. Today we visited Chatham Village, a planned community in the Mt. Washington section of Pittsburgh that's on the National Historic Register. It was developed in the 1930s in the model of the "Garden City" movement launched in England. It's as lovely and well-planned today as it was then. You can read more about it here and here.  The community consists mostly of townhouses grouped in clusters around common greens with curving sidewalks, giving it the feeling of a college campus, I think. And each cluster has a lovely "folly" like the one shown above to house communal garden implements. The homes have lovely details - red brick, slate roofs, copper gutters and downspouts, limestone around the windows, and crests above the entry ways. And each cluster of townhomes is a little bit different. Around the perimeter is a large park of virgin forest (dating back to colonial times and before) with paths that curve and wind along the hillside. We saw plenty of wildlife today, including a large buck with an impressive rack.
I know it seems crazy, since I haven't exactly posted regularly (okay, hardly at all) this past year, but I'm also writing now for another blog. The Route 19 Writers are a motley crew of mostly children's book writers who live along Route 19 South in the Pittsburgh, PA area. I've known most of them for years and am in awe of them as both writers and all-around-great people. We take turns posting (at least three times a week), usually on a different theme each month. For this first month, we chose the theme "Novels" - but we allow lots of leeway in what to write about. You can see my first post on NaNoWriMo (National Novel Writing Month) and other motivational writing "tools" here. It even has the super easy directions for making this charming button chair (get it? Butt-in-Chair? That's the main tool you need to get your novel done.) Of course, there's lots of other great stuff to find there too. A report on the great Katherine Patterson and her recent talk in Pittsburgh, a piece on finding your voice, a fabulous tutorial on twisting folktales to turn them into novels, new picture book stories, or tall tales, and even an interesting and funny discussion on figuring out what teens like to read (complete with very, very tasty recipe for Cornflake Chicken - yum.) I hope you'll check the blog out! Here!Next month's topic is Giving and Receiving. I'm still noodling what I'll write about when it's my turn - but I'm already promising some kind of a nice giveaway. (Let me know if there's something you'd like me to write about.) Oh, the new picture of the frog in my header is one I took this summer of one of the residents of my family's newish pond. I'll leave you with some images of flora and fauna around the pond this summer. (Can you tell I'm already feeling nostalgic for warm weather? Even though I really do love fall too.) 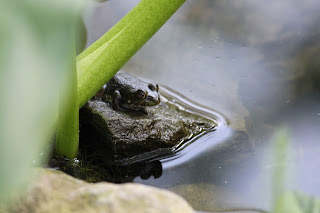 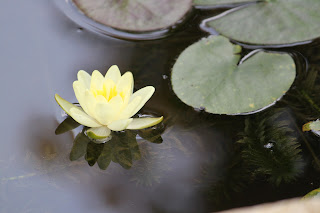 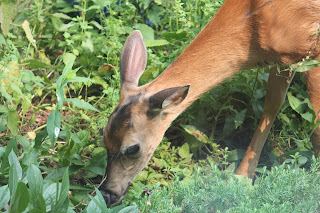
Karen MacPherson's syndicated Children's Corner column this week alerted me to an important occasion: the 50th birthday of Frances, star of the classic picture book series by Russell Hoban. (I strongly recommend reading Karen's column - always good and this one is chock full of interesting facts about Frances and how she came to be. Also, if you haven't read the Frances books, it's time to get to the library. Or better yet, go buy them.)
I first met Frances, the strong-willed, persnickety, song-writing, problem-solving badger, when I was a strong-willed, persnickety child myself. Although song-writing and problem-solving weren't my strengths so much, it's still small wonder that I identified with the young badger. The challenges Frances faces are universal ones of early childhood, and she confronts them with a quirky intelligence and creativity that I found both inspiring and reassuring. To celebrate this important event, I broke out some homemade bread and jam and my copy of Bread and Jam for Frances, my favoritest Frances book of all. Everything was delicious, and the dog enjoyed our read-aloud very much.
Possibly what she liked best was that I shared my bread and jam with her.
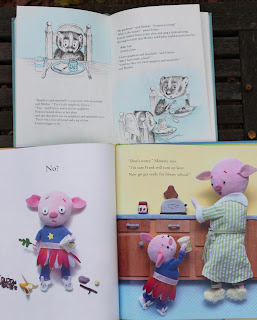 Anyway, I noticed something while I was reading the book: one spread seemed kind of familiar to me. And then I realized why.

I'm doing a radio show this afternoon on topics from my latest parenting book, The Preschooler Problem Solver (Peachtree, 2009). I'll post the announcement for the show below, which you can listen to on the radio, the internet or by podcast. Pat Montgomery, the host and a parenting expert herself, and I will cover lots of interesting topics, including how to handle oppositional kids, coping with meltdowns, talking to kids about fun topics like sex or family finances, how to help your child make and keep friends, and of course, that perennial favorite, how to get your kid to quit picking his nose at the supermarket. Should be a good hour - please join us or send Pat your questions!
In case you didn't get an email from me about the show, here's the official announcement from Pat:
It is about time someone wrote a book about preschoolers and the myriad of issues their parents face. My guest this week has done it for us and she is willing to tell all she knows. At least all that will fit into the hour long show! Carol Baicker-McKee PhD is trained in child and family psychology, as well as being a mom of three. Her book, The Preschooler Problem Solver: Tackling Tough and Tricky Transitions with Your Two to Five Year Old, is terrific. She has so many wonderful ideas and insights from all her experience that she shares in this book. And, it is a fun and interesting read! We are going to discuss:
1 Comments on Another Radio Day! Parents Rule with Pat, last added: 3/21/2010
I'm doing two radio shows today for my latest parenting book, The Preschooler Problem Solver (Peachtree, 2009). The first show today is with Grandparenting Today on WMKV-FM in Cincinnati OH. I'll be chatting with host Sue Zimmermann from 1:30 to 2 pm EST about a variety of topics related to young kids and grandparents. The show also streams live here.
Then this evening, I'll be talking about manners for munchkins with Stacey Powells on The Exhausted Parent Network show on KMMT radio in Mammoth, CA shortly after 7 pm PST. You can click on the link to listen to the show live here.
Come join us!
I'm making a wish for peace in 2010 - for the world, for my family and friends including all of you, and for myself.
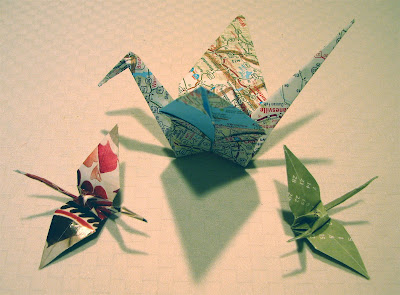
The paper crane is a symbol of peace. In 2001, I gave out paper crane ornaments (like the one in my current header) as my holiday cards, and this year I'm planning to make one daily - at the end of the year I'll turn them into something cool and auction the resulting piece for a donation to a peace-related charity (not sure which one yet).
The cranes are easy to make once you get the hang of them. A google search will reveal many, many tutorials for making them, including this animated diagram one here (I think it's pretty easy to follow.) Adding some beads makes the cranes hang a little better and look good as a stand-alone mobile. I use jewelry wire threaded through a long needle (large enough to fit through the body of the crane, from the center to the point on the top). The first bead can be a charm or dangling bead, and you can add others or just pass the wire through the body. You can also put more beads above if you like, or just make a loop in the wire to thread a ribbon through for hanging. For the last few years, I've made these often, and I keep them on a branch in my living room; if I need a quick gift for a visitor or to enclose in a note, I just grab one.
For several years, I've been making the cranes mostly from recycled papers (like the ones in the photos above). Here are a few close-ups of some from last year (though I apologize for all these crappy pix). These ones are from security envelopes:
And these are made from (left to right): a page in a magazine, a map, and a calendar page.
 There are several excellent children's books about paper cranes, including this one by Rosemary Wells, one of my favorite author-illustrators. Yoko makes cranes to stay connected to her grandparents who live far away, which is a nice use for your cr
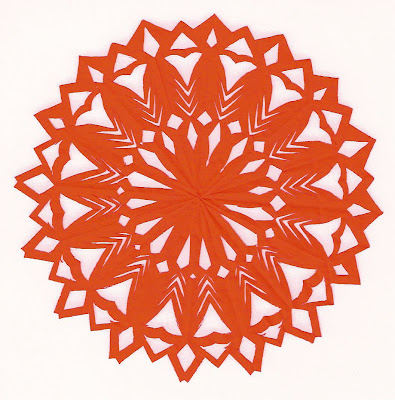  I'm not sure why, but I always have urges to do cut paper crafts at Christmas (which is why the floors are always covered in tiny scraps at the holidays).
The two paper cuts above were leftovers from a flurry I cut one year to decorate packages. They're basically just the snowflake idea. I precut thin paper (these were origami paper) into a circle, folded it in half (right sides together), in half again, and then into thirds and then cut patterns out freehand. There are a few simple tips that may help you make especially intricate ones: first, do the folding carefully and press the creases well (you can even iron them). Second, have a mixture of large cut away areas and others that are narrow and repeating. Be sure to use very sharp scissors; I use embroidery scissors. (Though check out these amazing Polish paper cuts that were traditionally made with sheep shears!) Finally, take care not to tear delicate areas when you unfold them. (Small tears can be repaired by gluing narrow support pieces to the back of the paper cut.) I always iron my finished piece flat.
 The paper cut above was done by my oldest son when he was almost 10, and the similar one below was cut when he was not quite 5. You can see he gained a lot of skill in the years between. In both cases, I folded a piece of paper for him (right sides together) and drew one image onto the wrong side, making sure I had an area of join along the fold. By 10 he was able to cut the design out pretty accurately by himself. I showed him how to trim the excess paper close to the drawn lines and then to cut into tight areas, removing sections at a time, rather than trying to cut along the whole perimeter. When he was younger, I held
 Dolls and Christmas have been entwined in my heart since I found Tiny Tears, above, under the tree the year I was three (I think). She had some great features - she drank from a bottle with real water in it, cried and wet, and her eyes only closed if you lay her down and rocked her. She also came with pleasing accessories - clothes, a doll bottle, diapers, and in my vivid memory, a pacifier that was the only way to make her tears stop. I clearly recall losing the pacifier on Christmas night when we ventured out to my cousins' house for dinner and weeping along with her as she cried out her lifetime supply of tears. But I recently learned from Kaylee's Corner that I have a faulty memory: Tiny Tears didn't come with a pacifier, much less need one to stop crying. It must have been her bubble pipe that I lost as I have no recollection of it in ensuing years. As you can see, Tiny was subject to some vigorous playing (and grooming) over my childhood. I practiced my mothering skills on her, cuddled her for comfort (hard body and all), pretended like mad with her, and even used her as an accepting, nonjudgmental confidante. Though I had many much loved dolls over the years, Tiny was and is my favorite of all and still sits by my work area to inspire me. Did you have a favorite doll?
If you'll be giving someone a doll for Christmas this year, and I hope you will be, you might want to consider a last minute dash to the bookstore (or click on an online seller) for a doll-themed book to go with it. Here are few of my vintage recommendations, one holiday-related, some not (and more to come in a later post I hope):
The Best Loved Doll by Rebecca Caudill with illustrations by Elliot Gilbert This old-fashioned, sweet story is back in print - hooray! - but the vintage copies are more appealing to me. It tells the story of a little girl invited to a party where prizes will be given for dolls in various categories. The girl owns dolls that would likely win prizes, but there's no prize that would be right for Jennifer, the doll she loves best. Which doll will she choose?  0 Comments on Christmas All Dolled Up I as of 1/1/1900
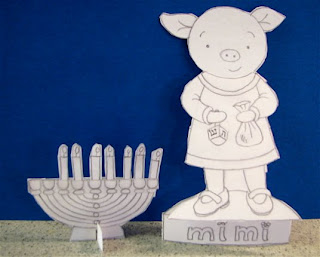 Happy Hanukkah! Nearly belatedly! In honor of the Jewish Festival of Lights, I have another Mimi paper doll available to print and color; you can get it here. There's a brief story-ette about Mimi going to a Hanukkah feast, and it includes a menorah that can stand up when assembled, as shown above. The top part of the menorah is a "pocket" in which you can insert the correct number of candles for the current night of Hanukkah (today is the 6th day of Hanukkah for 2009, so you'd insert six candles, plus the center one or shammes candle, which is used to light the others). I was too lazy/rushed to color Mimi and her menorah, but she looks great "colorized" with colored pencils or crayons. 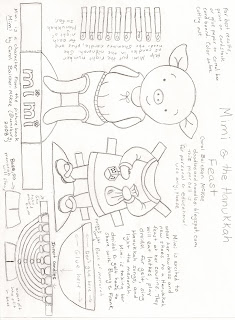 Not sure why this image came out vertically; thought I'd saved it rotated...
Quick question: I've been posting various paper dolls as sort of doodly coloring pages - just pencil sketches, and no color. What do you think - should I keep doing them that way, or would you greatly prefer something more final-artish that you'd have to print in color? (Keep in mind that would likely mean I'd make even fewer of them...)
One of my favorite things about December is the variety of special days (Christmas, Hanukkah, St. Lucia Day, St. Nicholas Day, the winter solstice, etc.), and the opportunities they provide to learn about different cultures (or even just people who have different traditions). My husband and I both grew up celebrating Christmas, so that's the December holiday we celebrate with our kids, but our extended families include people from diverse backgrounds, including the Jewish faith. We live some distance from them, so our kids have only occasionally celebrated Hanukkah with those relatives. Fortunately, though, we long had a tradition of sharing holidays with neighbors and good friends who are Jewish. Their kids came over each year to help decorate our Christmas tree, sing a few Christmas songs, and have a holiday dinner, and our kids went to their house each year for a Hanukkah feast, complete with dreidel games and songs and decorations. (They always sent extra latkes home for me, the latke-fiend. Yum!)
Here's my favorite low-fat latke recipe. I don't have a photo to show you because I haven't managed to make them yet this year, but I'll try to add a picture later. These are quite tasty, though perhaps not as scrumptious as the crispy fried ones. I cut the recipe out of some newspaper many years ago; more than that I can't tell you about its origin. Sorry.
Low Fat Potato Latkes 3 lbs. potatoes (I've used both Idaho and Yukon gold) 1 onion 1/3 cup matzo meal or flour 1/2 tsp baking powder 3 T chopped parsley 2 eggs plus 4 additional whites salt and freshly ground pepper, to t
 Not too surprisingly, I continue to fall farther behind with my attempts at daily blogging this month, even though the weather has been keeping me home and mostly inside - though also computer and sewing machine-free, as I seem to be taking my electrical interference tendencies to the wider community and causing neighborhood electrical outages. (Really we got some of that huge storm that hit much of the U.S. through here - really wild winds and plummeting temps for the last couple days. Brrr.) Not too surprisingly, I continue to fall farther behind with my attempts at daily blogging this month, even though the weather has been keeping me home and mostly inside - though also computer and sewing machine-free, as I seem to be taking my electrical interference tendencies to the wider community and causing neighborhood electrical outages. (Really we got some of that huge storm that hit much of the U.S. through here - really wild winds and plummeting temps for the last couple days. Brrr.)
On my drawing table this week are the little angels above. I made the prototypes last year (based on the characters in my Merry Christmas, Cheeps and Mimi books) intending them to be gift tags that could be made into ornaments, but never finished them. The dog found the paper prototypes the other day and got completely freaked out by them (they move when she breathes heavily on them), which inspired me to finish them, if for no other reason than the opportunity to freak the dog out in living color.  On my sewing table were also this old doll, in bad need of a new dress...  ...and this new one in need of, well, everything.  Lots of sewing and ironing!
Head on over to kootoyoo's to see the rest of the creative spaces bursting with projects. And take your time checking them out, because Kirsty's taking a well-earned break until after the holidays. (Phew - gives me more time to make some progress on my studio. And maybe finish up some of these projects.) While you're there, be sure to check out the pix of Kirsty's own beautiful creative space. I'm so jealous!
 Hot. Not. Loobylu. Need I say more?
This week, I'm starting with the NOTS.
Not. Any Computer in Our House. Or, for that matter, any electrical appliance, like say my car. My refrigerator. Half the lightbulbs. Lordy, it's been a week of technology-related woes, and I still feel a bit shaky. I know I was complaining about this last week, but things just kept getting worse every time I turned around, and of course my husband was out of town for much of the week, leaving me, the person who still struggles even just to turn on the TV (which is really not my fault, since we seem to have like a thousand remotes and way too many buttons and I never have the right ones), to be the family Geek Squad. Mostly that means we were computer-light (hence the week of no posts - but I have lots of stuff half written I'll try to post in catch-up fashion). And the car wouldn't go, so I was stuck at home. And the refrigerator was WAY too cold, freezing all the veggies and making the butter extra-rock hard. Maybe even diamond-hard. And I don't know what the heck was going on with the light bulbs, but they were burning out left and right and I still haven't caught up replacing them.
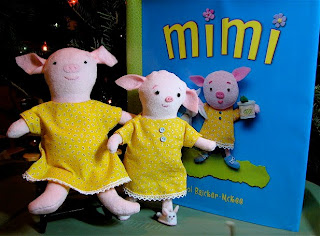
Making Little Dresses for Little Piggies. This little dress was way too small. This little dress was way too big. And this little dress was really too big too, but I fudged and made it kind of fit because I couldn't bear to try again.
 Not getting the recipe for this St. Nicholas Day treat up until today. Two days after St. Nicholas Day. These are actually buckeyes, which aren't officially a St. Nick treat, but they are very similar to a traditional St. Nick candy I found online. More importantly, they are super easy, no cook, use only ingredients I already have in the house, and contain chocolate.
Here's what you do: Combine 3/4 cup of peanut butter, 2 T honey, 1/4 cup crushed graham crackers O
 I'm joining in again with what's hot and what ain't at Loobylu (and you should definitely head over there to wish her a happy 10th blogging birthday at a minimum), but I'm starting to squeak in just under the deadline every week - but it's one of the "nots" fault. At least it's not yet midnight on Wednesday (here in Pittsburgh anyway), so here's my list:
HOT
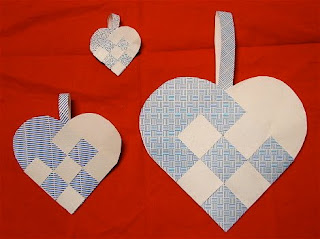
A Template for the Scandinavian Heart Tutorial Which I posted, um, last December here. Well, now that I've remembered again how to turn jpegs into pdf files and post them so you can actually get them (I think Blogger still doesn't allow them - somebody please correct me if I'm wrong), I decided to make a new printable (can't find the old one anymore) and quick get it up. You can get it here. It's not exactly pro-quality or anything, but it does get the job done - as shown in the examples above.  This (above, not the chili below) is what the finished templates should look like when you make them out of your cereal box. 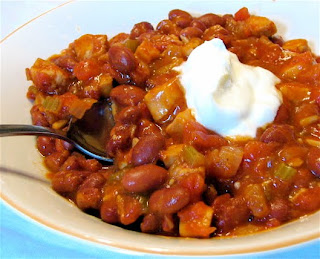 Turkey Chili - and Using Up the Last of the Thanksgiving Turkey Turkey Chili - and Using Up the Last of the Thanksgiving TurkeyThis is such an easy meal and satisfying on a cold night (and again for lunch the next day) and it makes a nice change from yet another turkey sandwich. I make my chili dinners a little differently each time (my usu
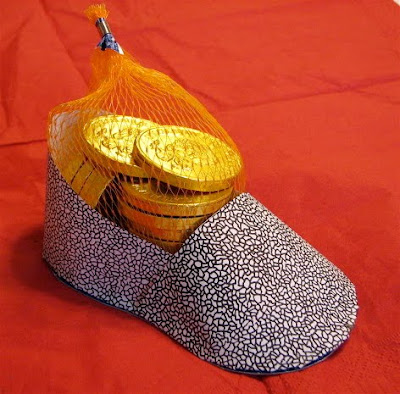 How goofy are paper shoes? But when I checked the stat thing for my blog the other day, I noticed that lots of people have been coming here looking for directions and a template for making them for St. Nicholas Day, which is coming up fast on December 6th. I felt kind of bad because I don't have anything like that on here. And then, probably because I've been busy making little bunny slippers for my Mimi doll, I realized I could figure out how to make some, so I did. These ones are just the right size to hold the bag of chocolate coins St. Nick is likely bringing my kids in a few days. (You can buy the same ones at Aldi's. Yum.) These paper shoes turn out to be very easy to make, and practically free (except for a small quantity of glue) because I used all materials from the recycling bin.
My husband says blogging is making me completely lose my marbles. He may be right. Only now am I wondering why people would want to make paper shoes for St. Nick Day - for party favors? For a class project? Because they're not sufficiently addicted to chocolate to overlook the fact that their bag of chocolate coins smells a bit like old sneaker if they put out their regular shoes to receive treats, like we do?
Whyever. Here's the tutorial: 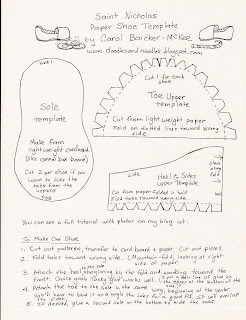 STEP ONE: Gather your materials You'll need: - a printed copy of the template, which is available as a pdf here,
- some lightweight cardboard (I used some from an empty cereal box),
- some scrap paper (I used the insides of security envelopes, which I am absolutely addicted to these days - I have fits if anyone rips the envelopes when opening bills),
- some kind of a quick grabbing glue, like Alene's Fast Grab Tacky Glue, pictured above (and no, Aleene's does not give me any kind of a kickback for how frequently I mention their glues, but I wouldn't say no if they offered one...),
- a pair of scissors, and
- a pencil for tracing the patterns
 Happy Advent, which I guess technically started yesterday, but in my household it begins officially on December 1st (making me early! At least in the U.S.!) Last year, I wrote about my family's advent traditions which are focused around a little Elf dropping by to leave the kids little gifts and chocolates in a pocket calendar to minimize the "I can't wait for Christmas" whining. I also linked to a zillion ways to make your own creative calendar. (You can see my 2008 post here - I checked and all the links still work. Amazing.) Happy Advent, which I guess technically started yesterday, but in my household it begins officially on December 1st (making me early! At least in the U.S.!) Last year, I wrote about my family's advent traditions which are focused around a little Elf dropping by to leave the kids little gifts and chocolates in a pocket calendar to minimize the "I can't wait for Christmas" whining. I also linked to a zillion ways to make your own creative calendar. (You can see my 2008 post here - I checked and all the links still work. Amazing.)
Anyhow, over the last year while working on my Preschooler Problem Solver book, I talked to a lot of parents about their families' holiday traditions and ended up feeling regretful that I'd failed to take our calendar tradition to the next level and use it to help instill some better character traits in my kids. Some families, for example, instead of doling out more goodies every day to their already privileged kiddos, set up a little empty creche with a container of straw next to it. The idea is that the kids (and I guess the adults too) add a straw to the creche each time they do a good deed. The family tries to amass enough kind works to create a nice cozy soft bed for the baby Jesus by December 24th. They didn't mention anything about having to remove straws for evil deeds done to your little brother, but that corollary might be useful in certain unnamed households.
Other families have traditions like decorating a tree via good deeds (you add an ornament each time you do something kind), having secret Santas within the family, secretly delivering goodies or thank you notes to deserving people around the community, or putting notes with compliments or promises of a family activity in their calendars instead of sugary things or cute erasers shaped like animals.
The closest my family came to some advent altruism was leaving an occasional little something for the advent elf and writing him teeny thank you notes at the end of the advent season. I'm reasonably proud I did that (not every night or anything! I was way too tired, plus struggling to remember to, um, remind the elf to visit in a timely fashion). You can read about sending elf thank yous in a post from last year here and find my pdf template for making a cute cardstock elf mailbox and mini card and envelope here. Anyhow, today's craft is making elf-sized food and arranging a welcoming rest stop for the present-deliverer who visits your house. This stuff is actually edible, as both I and the dog can attest.
Naked Mimi, above (I will finish her dress one of these days, very soon), is standing, or more precisely, sitting in for our elf, who just happens to be 9 inches tall like her, in front of a tempting wee feast, featuring a properly crustless peanut butter and jelly sandwich, cut on the diagonal as it should be, potato chips, apple slices, and bits of a blackberry artfully arranged to look like grapes (until they shriveled up while they sat on the counter for a couple hours waiting for me to get around to taking a picture of them).
2 Comments on Advent Traditions: Encouraging Affection, Kindness, and Gratitude with Tiny Food and Little Notes, last added: 12/3/2009
View Next 25 Posts
|
|


awesome pictures.
business market research
Happy birthday, Koko! I'm a pug lover myself, and my pug's 11th birthday is coming up on April 14. I've even devoted a blog (Confessions of a Pugophile) to the snuffly creature (who isn't nearly as talented as Koko; he sits on command (sometimes) and that's it).
I have all the books you mentioned. Another great (albeit strange) picture book is Tomi Ungerer's Flix. In it a pug falls in love and marries a cat.
Thanks!
Catherine your blog is wonderful, as is the adorable Pablo. I'd never guess he was almost 11! And even if the vet says he needs to lose some weight, he looks pretty svelte for his age.
(And Miss Rita is mighty cute too.)
For anyone else reading the comments here is the link to Catherine's pug blog: http://pugofmyheart.wordpress.com
Thanks for the book recommendation too. I haven't read Flix! And I love Tomi Ungerer too. Off to the library.
There is something so sweet and quirky about pugs! One of my son's roomates has a funny little black pug named "Olive" who is one of the most lovable creatures I've ever met.
Koko's birthday portrait by the fire is a-d-o-r-a-b-l-e!!!! (so is all the artwork - your daughter inherited her Mom's talent, for sure!)