Login or Register for free to create your own customized page of blog posts from your favorite blogs. You can also add blogs by clicking the "Add to MyJacketFlap" links next to the blog name in each post.
Blog Posts by Tag
In the past 7 days
Blog Posts by Date
Click days in this calendar to see posts by day or month
Viewing: Blog Posts Tagged with: kids crafts, Most Recent at Top [Help]
Results 1 - 20 of 20
How to use this Page
You are viewing the most recent posts tagged with the words: kids crafts in the JacketFlap blog reader. What is a tag? Think of a tag as a keyword or category label. Tags can both help you find posts on JacketFlap.com as well as provide an easy way for you to "remember" and classify posts for later recall. Try adding a tag yourself by clicking "Add a tag" below a post's header. Scroll down through the list of Recent Posts in the left column and click on a post title that sounds interesting. You can view all posts from a specific blog by clicking the Blog name in the right column, or you can click a 'More Posts from this Blog' link in any individual post.
Layers of paint, paper, oil pastel and a few hours of tremendous fun!I had an amazing afternoon on Tuesday. After reading a post by my Facebook Illustrator friend Holli Conger on lunch box notes I decided to warm up and do 3 little notes for my new step-children. Holli has been helpful to me recently with some needed advice - Thanks Holli.I decided to bless my family in this way and use it as a
2 Comments on Children's Lunchbox Notes of Love, last added: 2/23/2011
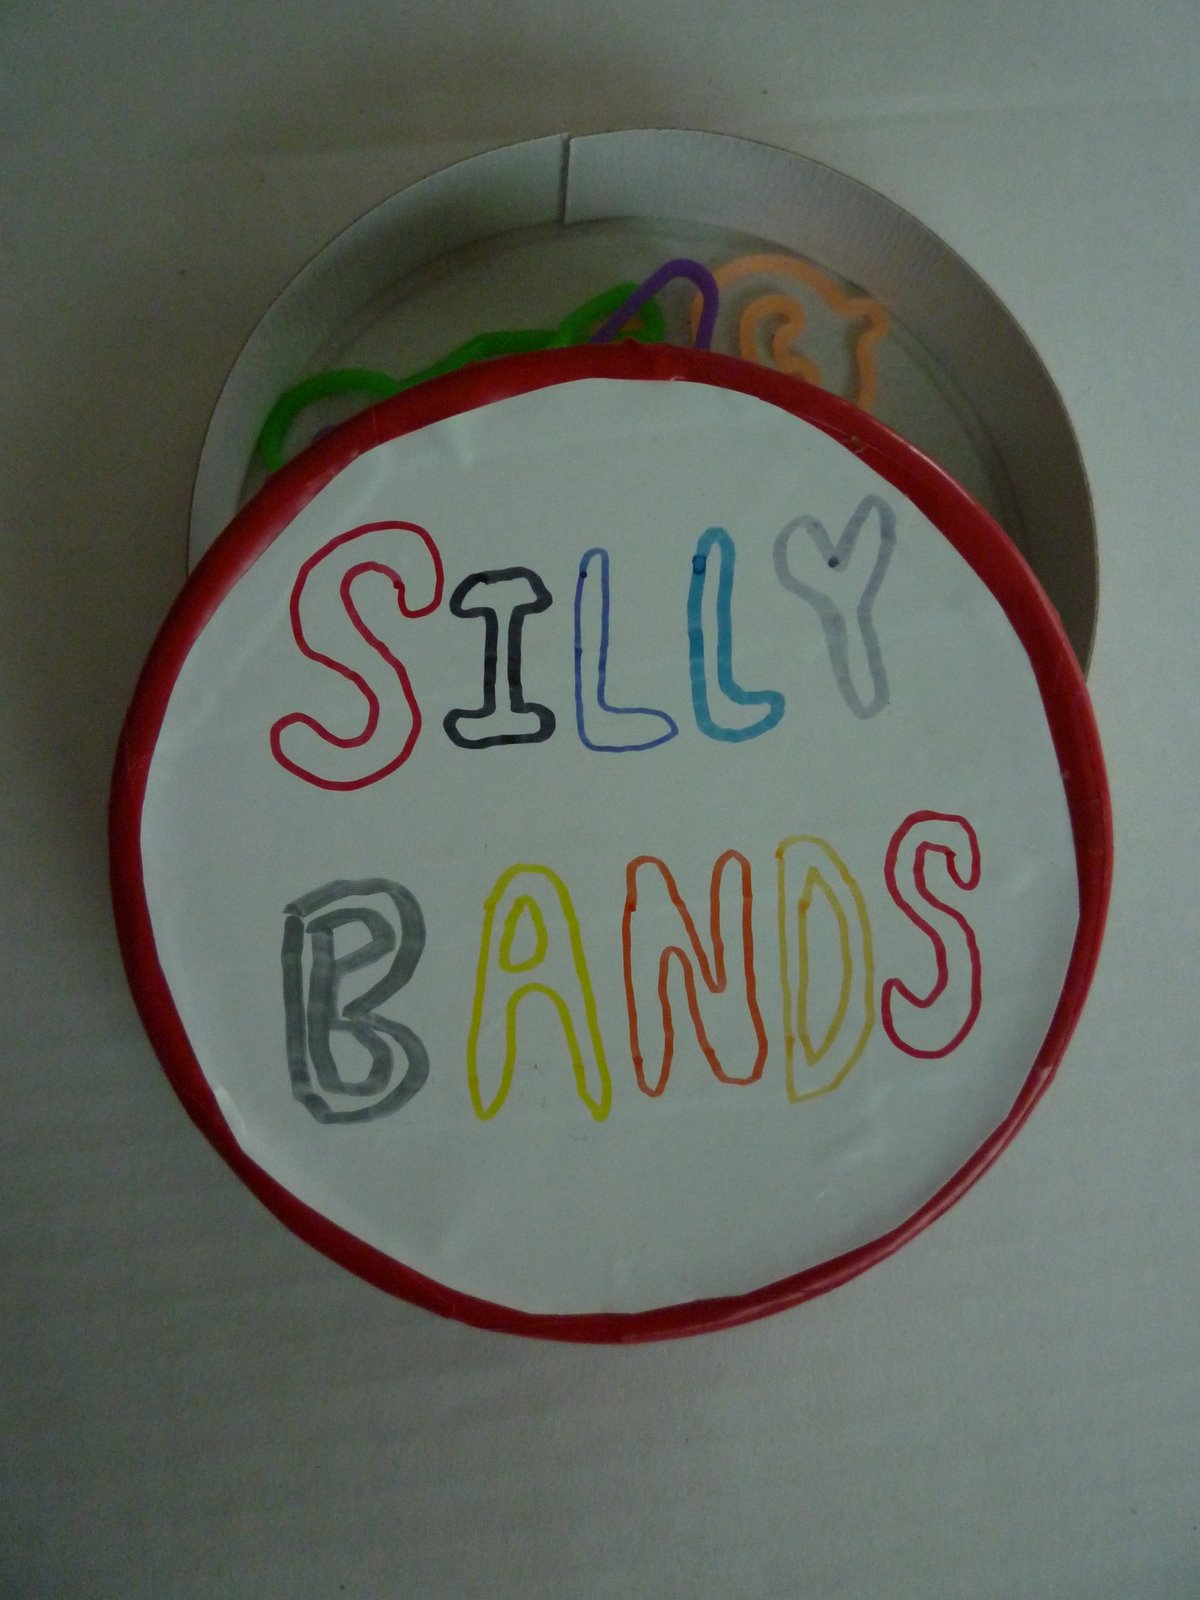
Is anyone else over-run by these crazy elastics that get caught in the vaccuum cleaner, wept over if lost and provide lots of entertainment when spread all over the kitchen table?
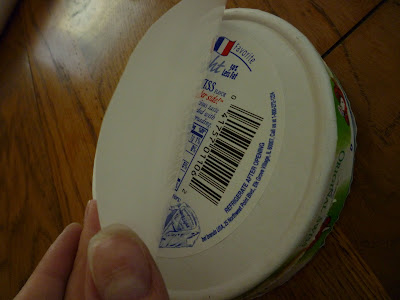
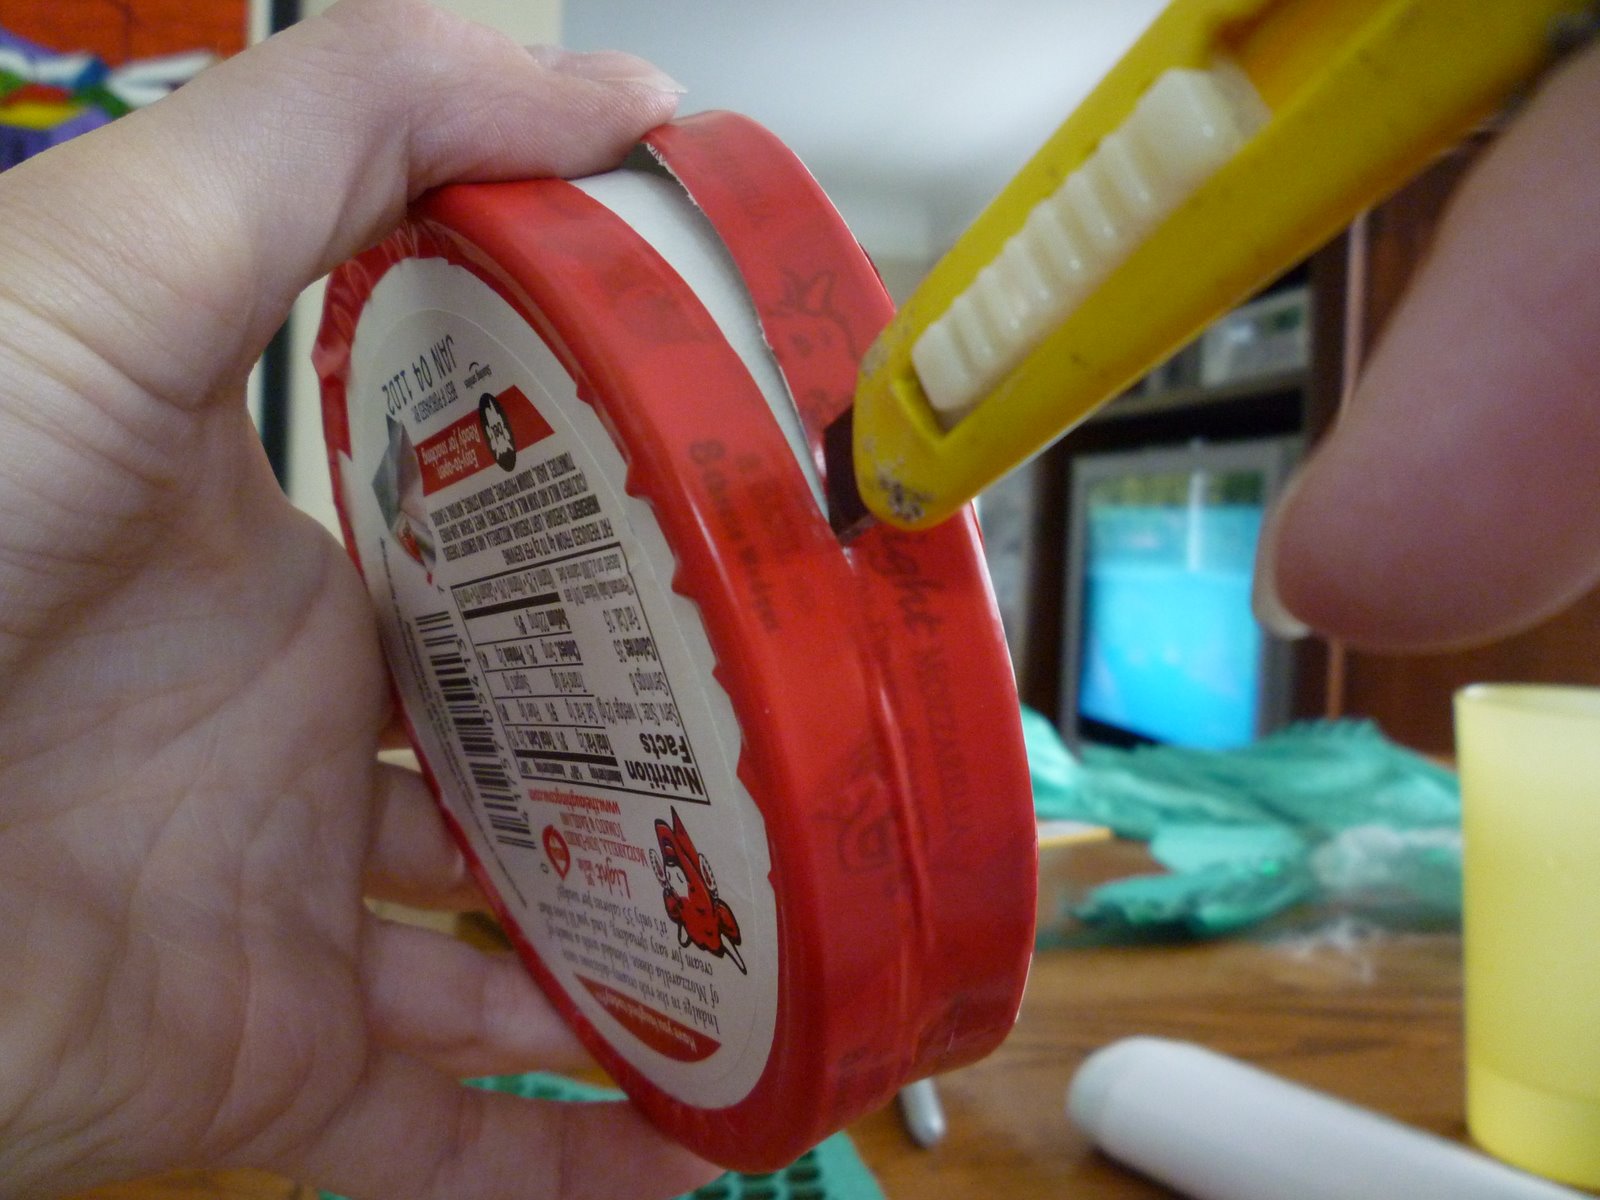
For better or worse, my kids like these things and I needed them to have a place to contain them. Also they are not allowed to wear them during class because of the distraction, but they still like to take them to school to trade at recess. Enter the empty Laughing Cow cheese container. After making these with my own boys we've had several playdates requesting to make them too. I think I could trade them for some lunch money at the corner of the playground, they are pretty popular. (Also great for holding trading cards, hair accessories and any little things).
I used regular adhesive backed shelf liner to cover the containers. I also have discovered that the labels peel off fairly easily, which I would recommend before covering. Because the containers are paper anything sticks to them fairly well and modgepodging can make a creative cover.
To cover the sides, any wide tape works well, then slice in half with a box cutter where the container is already opened.
Once they are covered: decorate with permanent markers, stickers whatever. They more personal, the more easily identified. For a thin, light weight container, it actually holds a lot of silly bandz and stays closed in a backpack that is thrown around, stepped on and used as a soccer ball.
3 Comments on Cheese and Silly Bandz, last added: 1/24/2011
ah, very smart kristin. i might have to adopt a similar solution for these things. especially since today ava just spent some birthday money on silly RINGS... even smaller and more likely to get lost.
Did you know a 2-litre soda bottle makes a great air traffic control tower? A covered cereal box is a great airport building. Parking paper airplanes was a problem. The boys came up with raised blocks to set them on as they arrive and depart. Making and flying paper planes is so much fun, and adding an airport adds to the fun!
5 Comments on Build an Airport, last added: 11/7/2010
I like how you used colored paper to make the airplanes. Usually we just use plane white paper (I don't know why). Next time I'll have to get creative and dig into the craft supplies or the recycling bin.
Sweet link to the Canon paper crafts J! I haven't seen it before. That is awesome, thanks for sharing! Thanks Diane and Jessica for your sweet comments.
Great idea - my boys haven't really gotten into paper planes yet (except the papers they bring home from church are always folded into planes...) We should do that when we are bored one day.
This was a fun and easy painting project. I found this idea on Charlotte's Fancy and she has step-by-step instructions. I thought they would be perfect rainbows for St. Patrick's day decor.
I love these Bingo style dot paints, they are easy even for toddlers and so mess free. You can get real bingo dobbers, but watch out, they are not washable and may be slightly toxic.
We got ours at Fred Meyer but they have them all over. That brings me to my give-away today...the prize at the end of the rainbow...
With today's give-a-way from Kroger you could buy all your supplies for this project, or some green grub for your St. Patrick's Day feast....Leave a comment by 7pm PST, March 17th (in honour of St. Patrick's Day) to win a $25 Kroger Family of Stores gift card (which includes Kroger, Ralph´s, King Soopers, City Market, Dillons, Smith´s, Fry´s, QFC, Baker´s, Owen´s, Jay C Food Stores, Hilander, Gerbes, Food4Less, Pay Less Super Markets and Scott´s Food & Pharmacy.) (open to US Residents only - I promise a give-a-way chance soon for my international readers.) Good luck!
The Kroger Family of Stores and General Mills provided me with the information, gift card and giveaway through MyBlogSpark for this event.
In the boys' kindergarten class this last week we made fun Good Luck cards for St. Patrick's Day. The idea is from one of my favourite blogs - Zakka Life. She uses an ink pad for hers and they are much neater, but the kids in the class loved getting their hands in the paint even though there was an ink pad too. We used folded over green paper for the card, glued a white square on it and painted away and wrote a few words too. They loved embellishing the cards. Whoever the recipients of these cards will be they are definitely LUCKY!
Supplies: White and green paper, green paint, and thumbs (scissors and glue sticks are optional)
1 Comments on Classroom Craft - St. Patrick's Day, a Four-Leaf Clover, last added: 3/15/2010
Here is another classroom craft we have done recently in Kindergarten for Valentine's Day. This one is thanks to Marie at Make and Takes and Craftzine for the tutorial. It was really easy to do the supplies in bulk: cut out and hole punch hearts, cut up straws and measure string for necklaces. One note, I discovered that wrapping a bit of tape around one end of the yarn, prevents fraying and frustration and makes for easier lacing. The children all loved wearing theirs. Here is E modeling his...
Also a great craft for making patterns - AB with the straw then heart, then ABCD (or whatever) with the coloured hearts.
3 Comments on Classroom Craft - Heart Leis, last added: 2/12/2010
Once a week I go and help in the kids classroom and the past couple of times we have been doing Valentine's Stuff, On this day each child did a chain of hearts in a pattern on a string. We used construction paper and it was really great because the hearts didn't slide around. It made for an easy garland., one punch on each side of the heart. The best part is the kids really liked doing it and over half the classroom was covered in a string of hearts (each end was tied to another and twisted around thumbtacks.
I have a lot of pictures with the kids making this but I don't think it would be right to post other people kids on my blog without asking them. Next time I'll try and take more pictures of just the projects for you guys!
2 Comments on Classroom Craft - Easy Heart Garland, last added: 2/10/2010
Oh I miss volunteering in the kids classes!!! What fun you get to have everyday w/ those kids of yours!!! I'm going to be sure to remember that museum when my little grandbabies come back ~ they'd love the cuttin action w/ the salmon! Thanks for the bucket loads of information you're always willing to share :)
Sometimes you need a little tropical beach in the middle of winter. This is a great use for leftover Christmas card boxes to help make your scene 3-D. We used sandpaper for the sand and blue paper for the ocean. I dug through some scrapbook paper and found some beachy stuff that E selected from, paper for the background, stickers, etc. We lined the box with some of the paper, glued a palm tree to the front then glued everything he wanted to stand-up to stiff cardboard (thank you recycling bin). Colouring pages also make great "scenes". Below you can see the how to for the stand up items, you can also see it doesn't have to be precise cutting, just a big enough piece to balance the image piece. Cut a small slit in each piece and slide them together so the bottoms are even.
This has been a pretty fun play set, beside the cutouts and set-up fun, we have also has a shark attack, a pirate raid and aliens land on our beach...
3 Comments on A beach scene in the winter, last added: 1/28/2010
Seriously Kristin, you need to go through all your old posts and put all your ideas into a book called "What are we doing today Mom?" and sell it for big bucks.
I love it and I love all your recent crafts. I have never met a mom as creative as you, I need some of that to rub off on me! THank goodness for you blog.
Have a Merry Christmas...are you guys coming to Elma?
This could be a great gift tag making activity depending on how you cut your stamps...
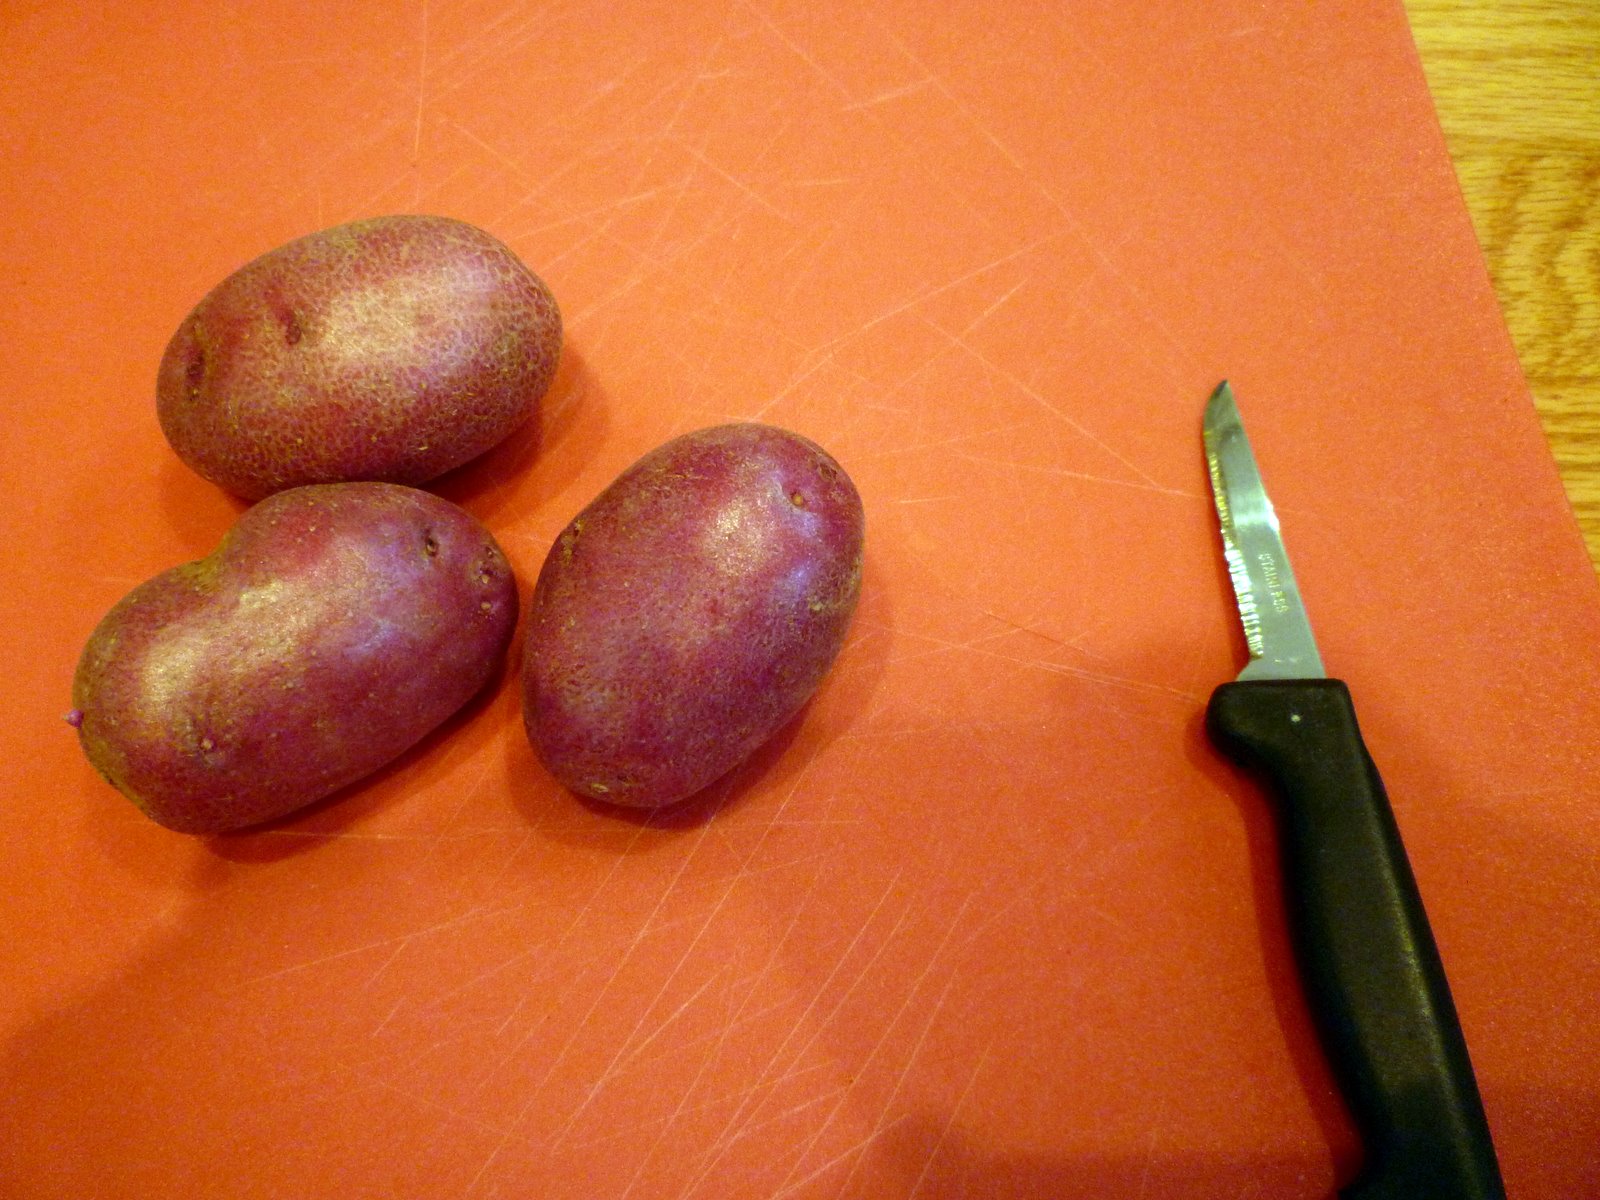
Cut your potatoes in half, lengthwise or crosswise depending on the finished shape you want. If you cut the potato with a large knife in one chop it will keep the flat surface more flat. If the surface is uneven the print may have problems. I also thought it was helpful to cut a little handle into the rounded side of the potato to make it easier to control the stamping and pull it off the paper.
Cut an outline into your potato. I used a paring knife. This is not for young children and is slightly dangerous for adults as well, although somehow I managed not to draw blood this time. It doesn't have to be perfect, you can polish it up later. My kids helped by coming up with the shapes we wanted, they drew them on paper as I cut the potato.
Then using the knife parallel to the flat side of the potato, about an 1/8" below the flat surface, cut away the edge of the potato. Now you can even up any rough lines on your shape outline as well as carve out any details (leaf lines, a smiley face, a word...no limits)
HINTS: Dry the potatoes well. Ready to paint and stamp. We found brushing/sponging the paint on thinly with a foam brush worked well (and you can apply several colours), rather than dipping into a huge glob of paint, but that was also an interesting effect so play around. Each potato may have different densities within it. We did an entire sheet of "practice" stamping. Potatoes are a little spongy so pressing down well helps print the entire shape, you can also rock it a little to achieve desired print. We had a little chant "press. press. rock, rock. lift!" when we first started to get the hang of it.
Rinse well after and send to the compost bin...
3 Comments on Potato Stamps - tutorial, last added: 12/3/2009
When I was a kid money was very scarce, but we did have a load of apples, from the tree, and potatos, from the garden. Potato stamping was something we did a lot of and your post brought back a heap of warm fuzzy memories. Traci's right that acorn too cute for words. Maureen. www.thepizzagang.com
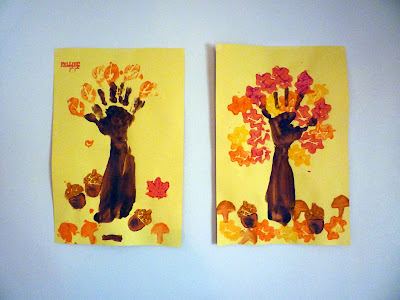
Humour me with one more autumn craft, it is still November after all...
A painted arm and hand makes the perfect tree...leaf styles are optional and we though about attaching real leaves, but since all the paints were out we choose potato stamping...
2 Comments on Autumn Tree with a hand print..., last added: 12/3/2009
First and foremost, one can never have too many fall or Autumn crafts, it is simply impossible! I love this one! The acorns are my favorite...too cute!
Thank you Martha Stewart for the pre-packaged kit that made these frames so easy. The kit has everything you need, including glue. The instructions have pictures, which makes the craft self-explanitory for little crafters, which means I can do my own crafting (ideally) or make dinner (most likely, as in this case). Cute project, good results and not frustration inducing for the boys. There is not much room for self expression with these, but you could collage your own supplies onto the frame to make them more personal. My boys have already decided their school pictures are going in these...
I was so glad someone wanted to be crafty with me at the fair last weekend (Even though no one wanted to look at quilts, sewing,etc.) . They were making coffee filter butterflies at a kids station. Luke and C didn't even slow down to look. E picked up his felt pen in style and coloured away!
Later the next day, I discovered the motive for the crafty moment...He needed something to trap in a spider web. Lovely, spider trumps butterfly. Try not to picture the struggle like I did when I came across this by my bed -
So quick instruction on these easy butterflies - color the coffee filter with regular markers (the more color the better). When finished, spray water on the entire filter (this blends the inks). Pinch together in the middle and wrap a pipe cleaner around it for the body, then turn the tops of the cleaner for the antennas.
4 Comments on Beautful Butterfly - Trapped!, last added: 8/16/2009
I love this, I remember doing something similar in grade school, but never would have remembered this on my own. Great idea on how to use up some of my pipe cleaners.
Here is something to do with those grocery store flyers - cut them up and collage, vegetable people are always interesting.
We have been reading The Tale of Despereaux: Being the Story of a Mouse, a Princess, Some Soup, and a Spool of Thread by Kate Dicamillo (Author), Timothy B. Ering (Illustrator). One the the characters is a soup genie - made of vegetables, so the boys wanted to make their own "soup genies".
3 Comments on You are what you eat - a grocery flyer collage, last added: 7/15/2009
Once I spoke the language of the flowers,
Once I understood each word the caterpillar said,
Once I smiled in secret at the gossip of the starlings,
And shared a conversation with the housefly in my bed.
Once I heard and answered all the questions of the crickets,
And joined the crying of each falling dying flake of snow,
Once I spoke the language of the flowers...
How did it go?
How did it go?
Those crafts are so cute! We took in one of those wooly bears too... but alas, he did not survive. I really don't know what went wrong. He just shriveled up in his cacoon... sad.
It took us awhile to get the hang of this and it was a little messy. Easy to clean-up but still messy.The easiest way we found to fill the balloon was putting the lentils in a small water bottle first, blow up the balloon slightly, put it on the end of the bottle neck and shake the lentils in. Three balloons is a good idea, when covering them watch out, they can be easy to rip with fingernails, three layers seems to be pretty sturdy.
What a great blog! I love the picture in your header. Thanks for the link. Looks like you guys had some messy fun. xo, Chrissie flipflops and applesauce.com
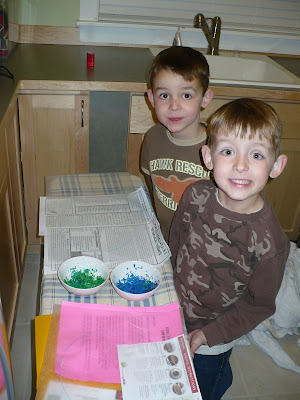
OK, this is not what is generally meant by "global warming" but is is an Earth picture that is warmed to create. I have seen wax paper/crayon shaving sun-catchers before and thought it would be perfect to make an Earth. They turned out better than I expected and I should note, messier than I expected too.
Supplies needed -
Large sheet of wax paper folded in half
A few blue and green crayons, different shades add a bit of interesting dimension
a place to put the shavings
Not a vegetable peeler, but a pencil sharpener (what was I thinking!! luckily nobody was hurt with the peelers) we switched to sharpeners early on and everyone could do it.
Goo Gone a handy cleaner for removing wax and crayon - it cleaned up my pans and molds from the last crayon melt nicely.
If I was going to do this again, I would sharpen some crayons of regular size and not mess with the nubs, save those for this.
Use a bowl to trace, or draw a circle on your wax paper, the size you want your earth, then set aside.
Sharpen your crayons so you have a little pile of shavings, you really don't need very many. Prepare your ironing board - cover it with scrap paper or newspaper to protect it, I would also recommend aprons because hot wax is very runny.
Sprinkle shavings inside the traced circle, if you want a geographically correct earth, you could put a print out/picture under the wax to follow. My boys enjoyed making their own islands and putting Mexico next to Africa and India.
Fold the sheet of wax paper over top the shavings, or add another piece on top. Cover this with another sheet of newspaper to protect your iron.
You may want to do this step yourself, rather than let your kids, but since I'm crazy and my ironing board locks at a lower height... gently iron, it melts quickly and be careful, don't push down on the iron or the wax will ooze out the sides.
While the wax cools, turn off your iron now so you don't forget. Remove all the scrap paper and admire your work.
We then cut the paper into circles, I'll post a picture of them in the window tomorrow catching some sunshine. I like how the paper bubbling resembles clouds.
Happy Earth Day!
6 Comments on Global Warming, last added: 4/24/2009
So I've been wanting to do this for awhile. I tried to heed warnings of my dear friend Susan and avoid some problems, but there were still some complications. (Hers turned out great and made me want to try regardles). Despite the cupcake liners being doubled, the wax still seeped through and left residue on the pan - I should have thrifted a pan to be reused for this project. I haven't figured out any way to get the residue off the pan or my silicone - any ideas? Thanks Susan for sparing me the toxic fumes of heating to the max.
I am happy with the resulting crayons. Since I think my pans and molds are now only useable for this I will do it again when we have enough broken pieces. I think the lower heat is the way to go - 250F about 15-20 minutes, then I picked up the doubled liners and poured it into the molds while still hot. The silicone is great for non-stick and the crayons came out nicely, except for the residue.
The crayons themsleves seems sturdy and colour well. We used whatever brands and no-named broken freebies and I don't think it mattered. I mostly mixed each melted cup with craft sticks for a solid colour. I might try pouring them in layers for a striped crayon. It was easy, but the kids can only be involved in the prep of the crayons - peeling and breaking, the rest is a litle burn risky. of course they are great testers of the crayons. I think the crayons will work really very for texture rubbings.
There are many other ideas for melting and uses out there I thought I'd share some I reviewed before attempting this -
E really wanted a map of the solar system for his space explorations. I had him make his own. The big strip of paper was his idea and it worked well. He traced various sizes of circular objects for the different planets. On one end he started with the sun, then did the planets in order they orbit. He tells me he wants to be an artist sometimes. I really like how he pays attention to all the details and used different techinques on each planet.
We used two great reference books to check out the details on each planet.
5 Comments on Out of this world, last added: 4/6/2009


 Sprinkle shavings inside the traced circle, if you want a geographically correct earth, you could put a print out/picture under the wax to follow. My boys enjoyed making their own islands and putting Mexico next to Africa and India.
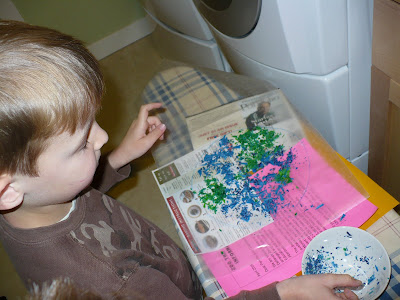 Fold the sheet of wax paper over top the shavings, or add another piece on top. Cover this with another sheet of newspaper to protect your iron.


.jpg?picon=694)
Very cute. They look so retro!
This warms my heart. You are an awesome mom!